Pages

Monday, 29 September 2014

The Creative Blog Hop

Today I'm sharing something a bit different, but I hope you find it interesting. I was invited to join the Creative Blog Hop by my lovely friend, Kim Badelt, of Kim's Stamping Spot awesomeness. Kim's work is always inspiring & includes lots of beautiful details so I feel very honoured she asked me to hop.

What is the Creative Blog Hop? 
It's a continuous blog hop every Monday where crafters answer questions about their crafting & creative process, then tag others to continue on the blog hop the following Monday. I have no idea who thought of this, but such a fun idea. So onto the questions...

1. What am I working on now?
I've finished a tutorial for a Christmas gift card project (sneak peek below), which I'll share in a separate post later this week, & am thinking about my next Christmas class projects. I'm also learning how my e-cutter can help me design 3d projects & doing a bit of reorganising in my craft space, thanks to a new shelf.
2. How does my work differ from others in my genre?
One of the reasons I love papercrafting is that there are such a broad range of styles, techniques & products to try. My style tends toward colourful, layered projects with mostly clean lines & cards with different shapes & folds. I also love creating boxes & 3d projects - it still gives me a thrill to transform a flat piece of card with just a few cuts & scores. Lately I've been designing & sharing more project templates & instructions. These are always popular with my class lovelies & now with pinners & blog visitors too. You can see my most popular posts on my left sidebar.
3.  Why do I create what I do?
At it's simplest, messing around with paper & ink to create something just makes me feel creative & happy. Even better, I can share what I've made with someone else & hopefully brighten their day too. Looking back, I never thought I'd enjoy sharing my love of papercraft & Stampin' Up! with others, in person & online through my blog etc, but I really do. Papercrafting has brought me so many blessings, the greatest being some of my dearest friendships. What's not to love :-)
4. How does my creative process work?
Class projects generally start with a theme, product or technique. For friends & family, I try to think about what they like (themes, colours etc) & make something special. Most of my favourite projects seem to come together pretty quickly, but in general I'm a pretty slow & messy creator. Like many crafters, I have a lot of crafty goodies, so it's probably a bit ironic that I think I'm most creative when I set limits on what I'm going to use or when I'm using the scraps on my desk.
Of course I'm also inspired to try new ideas shared by papercrafting friends & the papercrafting community in general. How awesome that we have amazing online sites & communtities like Pinterest & Splitcoast Stampers to connect & see creations from all over the world.

Well, that's enough about me. Now I have the pleasure of introducing & nominating a very talented papercrafter to continue the hop next Monday. Please welcome the lovely Emily Campbell of Tiny Kiwi Cards.
I met Emily on one of our online Demonstrator groups & am always wowed by her creations & style. I'm sure you will be too.

I'm Emily Campbell, from Auckland, New Zealand.
I am mum to three lovely daughters, aged 3, 5 and 7, and I started scrapbooking when my oldest daughter was born, although I have always kept diaries, journals, albums and mementos. I've had a love of paper and stationery for as long as I can remember. I have been a Stampin' Up! Demonstrator for 2 1/2 years and have recently enthusiatically embraced the Project Life memory-keeping system, in addition to my other paper-crafting. I also work part-time at the girls' school. I look forward to joining the Creative Blog Hop next week.

I can't wait to see & hear more from Emily next Monday (6 October) when it's her turn to do the Creative Blog Hop. If you're looking for even more papery inspiration in the meantime,  please do check out the blog faves on my sidebar too.
Until next time...
Inky wishes, Di

Wednesday, 24 September 2014

Teen birthday with Age Awareness

Today's share is another card made for a teen friend of Cara. I didn't have any specific requests from Cara so I just had a play with some new goodies & pieces I had on my table... & came up with this.
Some notes on the card...
The happy birthday panel is stamped freehand with the Age Awareness stamp set - one of our new clear photopolymer sets. It was sooooo easy to line up the words & with no stamp-a-ma-jig in sight. I love this set as it's so useful & suitable for lots of people. I've popped it up with dimensionals too.
The silver glimmer paper stars are embedded in the pool party strip. I punched stars in the pool party strip, then placed the punched glimmer paper stars in the holes. They fit pretty firmly, so it's easy to place on the card & stick down.
I made the bermuda bay frame shorter - I hid the joins behind the birthday strip.
The strawberry slush fringing is made with our fringe scissors - easy!
These colours could easily be swapped out for more neutral or masculine colours too.
Anyway, thanks for visiting today & I hope you like the card & find the tips useful.
Inky wishes, Di

Product List To see & order any items used in today's project, just click on the items below to see them in my Online Store. You can order from me if you live anywhere in Australia. I would love to be your Demonstrator if you don't already have one. Please allow "Demonstrator contact" in your preferences so I can thank you properly when you place your order.
Product List
Silver Glimmer Paper

Tuesday, 23 September 2014

Mortal Instruments fangirl birthday

Sharing something a little different with you today....with no stamping (gasp). I love to make cards that reflect the interests or personality of the person they're for. One of Cara's friends really loves books & especially the Mortal Instruments series by Cassandra Clare, so I decided to try making her a Mortal Instruments themed birthday card. This is how it turned out.
Since the theme was so specific, I used my e-cutter to design & cut the main black panel - which features the Angelic rune symbol & font used in the books (Pterra). I've popped the cut panel over champagne glimmer paper & spritzed with champagne mist shimmer spray so it's very sparkly! Click on the pic to see a clearer, bigger version.
On the inside, I've added more runes & printed message (I've erased her name from the pic). Normally I'd write or stamp this, but I wanted to use the Pterra font again.
I made a matching envelope & used the positive image from the cut-panel to seal the envie.
I think the birthday girl shadowhunter enjoyed her card, which makes me happy too.
Back next time with a stamped teen birthday card.
Inky wishes, Di

Wednesday, 17 September 2014

In review - centre step cards - now with instructions

After sharing my long centre step card yesterday, I realised I hadn't shared instructions for regular sized centre step cards. Cue new blog post! :-) Before we get to the tute, here are some of the cards I've made in this size. I've included links back to the original posts for more pics & detailed info on the projects too.

Party Penguin
This card is the 3rd most popular post on my blog ever so I guess you like it. Thanks :-) It's one of my faves too.  See original Party Penguin card post here
http://dianebarnes.blogspot.com.au/2012/06/sweet-party-penguin-for-cara.html

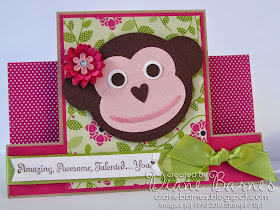
Sarah's Monkey Birthday
Another fun card for a monkey loving friend. See original monkey centre step card here
 http://dianebarnes.blogspot.com.au/2012/08/centre-step-monkey-for-sarah_28.html
Flower Pot Cards
The centre step base is very much the supporting act for the pretty & removable flower pots. See the original post for more pics, info & links to make the flower pots.

http://dianebarnes.blogspot.com.au/2012/07/helens-brilliant-flower-pots.html
 http://dianebarnes.blogspot.com.au/2012/07/helens-brilliant-flower-pots.html
Regular Centre Step Card Instructions

So, if you're ready to make your own centre step card...Here's the link & a screen shot of the pdf.

View & Download Regular Centre Step Card Instructions here

https://drive.google.com/file/d/0B-vLPiDO8NjOWkNEOXB5WURkUjQ/edit?usp=sharing
 Notes:
* Measurements are provided in centimetres & inches to match the regular sized cardstock available, so cm measurements are based on A4 cardstock. Inch measurements are based on standard 8-1/2 x 11 inch US cardstock.
* The instructions doc is designed to print A5 size (half an A4 sheet), to fit our class instruction books. Select fit to page in your printer options if you want to print it bigger.
* My docs are hosted on Google Drive. Just click on the link to view the pdf doc, then select 'download' to save the pdf to your computer-device. Please don't select share, as this just sends me an e-mail request.

Thanks for visiting today. I hope you find my centre step instructions useful & enjoy making your own. Leave me a comment if you have any questions about the cards, tute, anything SU or just want to say hi. I love hearing from you. I'll be back next time with some new projects.
Inky wishes, Di

Tuesday, 16 September 2014

Masculine centre step card - with instructions

Ahh the best laid plans, but I'm finally sharing the second card from my Father's Day / masculine card class in August - a long centre step card.
Fancy fold cards are so easy & fun to make. They're especially great for masculine cards, since they also reinforce how clever we are to our husbands, dad's etc (grin), so I designed a long centre step card version to suit the oh so flexible & popular image from Lovely as a Tree.
I  added quick colour & a modern twist to the image with the long stamp from Work of Art. The idea was inspired by the masking tape technique used on this great card. I used pear pizzazz for the grass, lost lagoon & soft sky (stamped off) for the sky. I also used part of the tree image for the message panel on the card back.
Here are some more pics to show the centre step effect, which raises the centre front panel out from the rest of the card.
 
One last note - this card fits a standard business sized (DL) envelope, or you can make your own pretty one with your trusty envelope punch board.

 Long Centre Step Card Instructions

I often prepare instructions for my class lovelies & am sharing them here, since you all seem to like them too.
 https://drive.google.com/file/d/0B-vLPiDO8NjOVTE0UDNPN2lNTDg/edit?usp=sharing

Notes: * Measurements are provided in cm's & inches. The dimensions for each are slightly different to make them easier to measure-cut, so please use one or the other, not both together!
* The doc is designed to print A5 size (half an A4 sheet), to fit our class instruction books. Select fit to page in your printer options if you want to print it bigger.
* My docs are hosted on Google Drive. Just click on the link to view the pdf doc, then select 'download' to save the pdf to your computer-device. Please don't select share, as this just sends me an e-mail request.

Thanks for visting. I hope you liked my project & find the instructions helpful.
If you have any comments or questions about the project, instructions, anything else SU, or just want to say hi (or thanks), I'd love to hear from you.

Inky wishes, Di

Product List