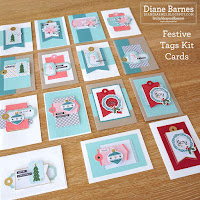
Hello and welcome! Today I have 15 fun cards to share with you made with the fabulous Festive Tags kit. The kit was designed by Stampin' Up! to make 15 beautiful tags but it was really easy turning them into Christmas cards instead.
I loved the colours and images included, so over a weekend I played with the pieces in the kit and made 15 different cards. I added only cardstock (and some embossing with the Snowflake Sky 3d embossing folder).
I hope this idea will be helpful l to anyone like me who's still making Christmas cards, or any super organised people prepping for next Christmas. Take a look at how they turned out.
What do you think? Read on for more info on what I did. At only $23 (in Aus), the kit is a very economical option, whether you're making it as is or turning it into cards. You only need to add cardstock, which we all have I'm sure. Here are all the kit pieces included.
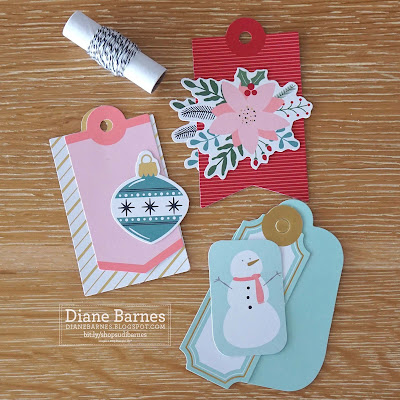
There are 5 kit themes/designs (3 of each design): tree, snowman, wreath, bauble and flower. The kit includes lots of shaped pieces and self adhesive sentiments as the kit tags have multiple layers, so there were lots of options to mix and match. Plus of course some bling too.
Here's a closer look at some of the tag pieces:
Before we take a closer look at the cards, some notes about them:
- The card bases are all standard
cards made with half a sheet of A4 card (21cm x 14.8cm, so a 10.5cm x 14.8cm front).
If you're in the US or Canada using 8.5 x 11 inch card instead of A4, your standard card base is shorter and wider than mine, but the layouts will still work. - I only used the kit pieces, plus
cardstock for the card bases and any strips or matting.
- The colours used
for the card bases and any other layers are: Thick Basic White, Crumb
Cake, Pool Party, Lost Lagoon, & a single piece of Real Red. In
hindsight, the Real Red panel could have been any of the other colours but hey, I was playing and having fun).
- I don't have measurements for any of the designs. I literally just cut the pieces as I created the layouts. Knowing the base size above, you can work out close measurements. If you really get stuck with any, leave a comment and I'll try to help.
- Some have panels embossed with the beautiful Snowflake Sky 3d embossing folder. This gives a lovely, stepped up look, but I decided to use plain cardstock for most, which I think looks good too.
- There's no stamping on the front (shock!). The kit sentiment options looked great and worked really well. I'll stamp a sentiment inside.
Now take a look at each design...
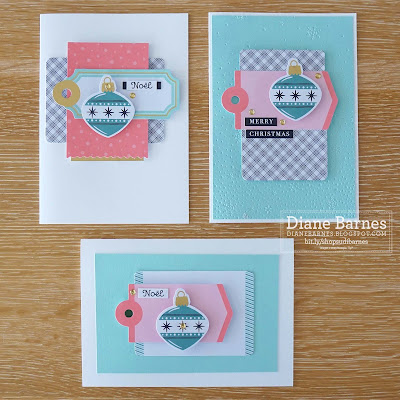
Baubles
- These are all Basic White bases (my go-to) with Pool Party panels.
- The top right card has a Pool Party panel embossed with the Snowflake Sky 3d embossing folder.
- I cut or hid the tag end on the black and white check pieces.
- I introduced some Crumb Cake and Lost Lagoon panels to this White and Pool Party for these ones.
- You'll see the top left layout replicated in the tree cards too. I think that's the only card with the same layout as any other.
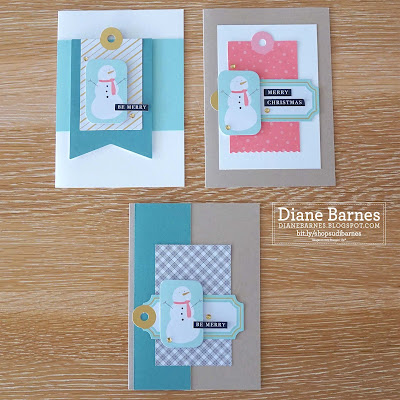
Trees
- Some more embossed panels here.
- For the bottom card I cut the bottom tag in half to make it look longer - the cut is hidden behind the other panel.
- I think these are stylised poinsettias, but very lovely regardless.
- You could easily make these into everyday cards rather than Christmas cards too.
- For the top left card, I cut the banner using the tag piece as a guide.
- For the bottom card, I cut a little scrap of gold card off the scrap leftovers.
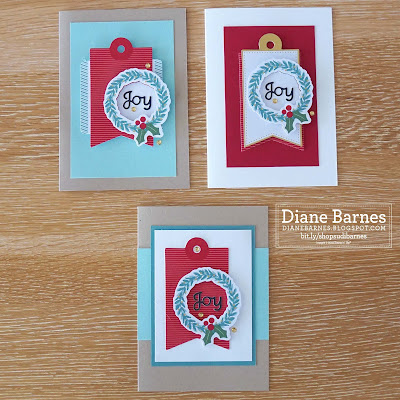
- Last but not least, we have the wreaths. You may notice I used the same red banner tag piece for all three cards. I just liked it with the red in the wreaths.
- The white in the top two wreath centres is the leftover from popping out the wreath.
So that's my Festive Tags Kit step up set of 15 cards. I hope you liked what I made with the kit and will try it yourself. I can honestly say this is one of my favourite projects this year. It was so much fun playing with all the pieces to create something new that's still quick, easy and supply friendly.
You'll find and can shop for all the supplies you need to make your own version here in my online store. Leave a comment if you liked this idea, want to see more, or have any questions.
Thanks for visiting today, and until next time, happy stamping.
Di
You'll find and can shop for all the supplies you need to make your own version here in my online store. Leave a comment if you liked this idea, want to see more, or have any questions.
Thanks for visiting today, and until next time, happy stamping.
Di
SHOP ONLINE EXCLUSIVE RELEASES
Shop November new releases - available while supplies last
All these items are not listed in any current catalogue
Shop November new releases - available while supplies last
All these items are not listed in any current catalogue
New kits released each month
.png)






No comments:
Post a Comment
Thanks so much for taking the time to leave me a comment. I really love hearing from you.
In line with new data protection legislation (GDPR) by commenting you do so in the knowledge that your name & comment are visible to all who visit this blog and thereby consent to the use of that personal information for that specific purpose.