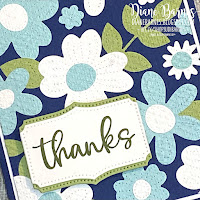
If you've been following along with me lately, you'll know that I'm a huge fan of the Pierced Blooms die set. I hope you are too as I have another card to share with you.
I actually made this one back in July as part of a technique spotlight share on the South Pacific Direct to Stampin' Up! group. I chose to revisit a past fave technique - inlaid embossing - using two current faves - Pierced Blooms dies and Biggest Wish.
The colours are similar to my last colour challenge card - Night of Navy, Balmy Blue, Pear Pizzazz & White - with a touch of Mossy Meadow for the stamped 'thanks' sentiment (Biggest Wish).
What is inlaid embossing?
Inlaid embossing is an easy technique using card/paper pieces and an embossing folder to create a beautiful background that looks like a single, textured layer of patterned paper or fabric.
It's one of those techniques that always surprises & wows as it really transforms the piece. I think you can see the effect on this close up photo - click on it for a bigger image.
 |
The sentiment panel is made with a great label die also included in the Pierced Blooms die set. The Pear Pizzazz label was cut in two & adhered behind the white label to create a border. A good tip when you don't have a nesting shape.
Inside, some more simple flowers - why wouldn't you add as many of those pretty blooms as you can :)
If you haven't tried inlaid embossing before or would like a refresh, read on for instructions and tips to get you started. Once you've tried it, you'll be creating all sorts of designs.
You'll find a supply list of everything I used here in my store, where you can order what you need to make your own.
Inlaid Embossing Instructions
What you'll need:
- Card or paper to use a background
- Die cuts, punched shapes or strips of card/paper
- Detailed embossing folder - A small, repeating pattern works well as it will tightly squeeze the card layers together. I have used the Tasteful Textile 3d embossing folder for this project. Experiment to create effects
- A large die that does not cut, like the Stitched Greenery die should work too. I want to try this for my next project.
Instructions:
- Layer & adhere die cuts etc onto the background card.
- If creating a full background, place pieces over the edges. It's generally best to limit layers to 1-2 pieces so it can be embossed effectively.
- Cut off any shapes overhanging the card edges.
- Place card piece in embossing folder, being careful to place your design so that the right side is facing the pattern you want.
- Roll folder through die cutting machine. Check after to ensure the piece is fully embossed. You may need to add a paper or card shim if your embossing folder is not very detailed or deep.
- That's it - use your panel to finish your card.
Faux inlaid embossing
This is another similar fast and fabulous embossing technique you can try that creates a similar look using just patterned paper. Simply run a piece through a softly patterned folder. Something magic happens to paper when you do this, as it becomes so tactile.
The retired Subtle embossing folder is my all time fave for doing thisThe Tasteful Textile folder is a current alternative that works well too.
Thanks for visiting today and I hope you enjoyed & my card and technique. Leave a comment or pin to Pinterest for later inspiration if you do.
I have another simple Pierced Blooms card to share with you and another inlaid embossing card so pop back soon.
See all my Pierced Blooms cards here
Happy stamping & inky wishes
Di
SHOP PROJECT SUPPLIES HERE IN MY ONLINE STORE
.png)


No comments:
Post a Comment
Thanks so much for taking the time to leave me a comment. I really love hearing from you.
In line with new data protection legislation (GDPR) by commenting you do so in the knowledge that your name & comment are visible to all who visit this blog and thereby consent to the use of that personal information for that specific purpose.