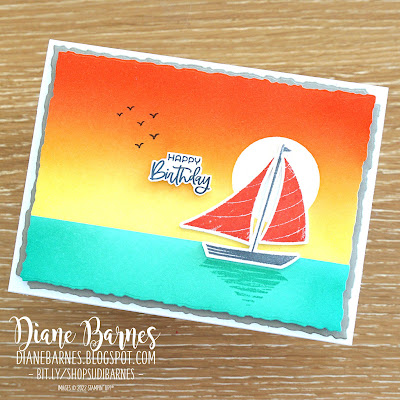
Hello & welcome. Today's project is the second from my Summer in Winter class - a sunset scene featuring masking and ink blending techniques using Blending Brushes, and images from the Let's Set Sail stamp and punch bundle.
We've had lots of amazing sunrises and sunsets in Sydney over Winter, in between tons of rain so I thought it would be fun to recreate them with an idyllic Summer vibe.
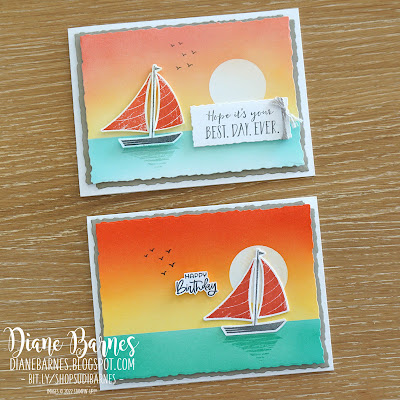
I have two versions to show you - the original sample with a soft, dreamy sunset, and a post-class one with much deeper ink blending using the same colours. Here's the original...
My first step was to mask off my Basic White card piece with Masking Paper so I could work on creating the water section. Once it was done I added the circle mask to create the sun, covered the completed water with a new piece of masking paper and worked on the sky.
After seeing Patty Bennett's sunset cards here in this post, I tried her suggestion of including Flirty Flamingo in my blending mix, and I really liked the effect.
Ink colours and blending order
- Water - Coastal Cabana, Bermuda Bay
- Sky - Daffodil Delight, Mango Melody, Calypso Coral, Flirty Flamingo
My favourite moment is when you remove the masking paper to reveal the sharp lines and blended colour changes between sections. Magic!
Once the colouring was complete, I cut the inked background with the largest of the nested Deckled dies, which to me gave it a fun, vintage postcard vibe.
Then it was time to create the scene with the stamped and punched yacht, birdies, and sentiment - all from the Let's Set Sail stamp set. Colours are Basic Gray and Calypso Coral, with Coastal Cabana for the yacht shadow.
A smaller Deckled die carried the theme over to the sentiment, with some knotted Linen Thread for a nautical feel.
More Sahara Sand Deckled layers behind the inked panel create a shadow border.
Card 2 - Let's Go Bold
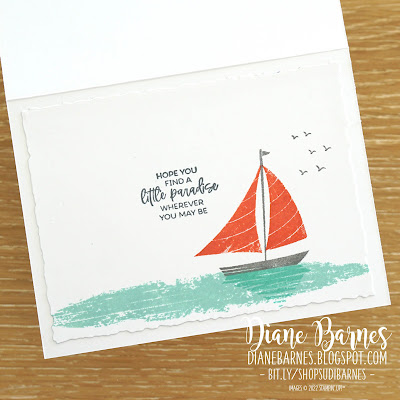
I tried a different yacht position in front of the sun, which I liked. I also used birthday sentiments from the the Paradise Palms stamp set inside and out. Did you notice that the yacht stamp image has a bit of a fun, distressed look,. I fussy cut the sentiment from Paradise Palms.
Tips to creating a masked ink backgrounds:
Prep for success- Start with a piece of card that's larger than you need, so you have some wiggle room to adapt your layout, disguise or cut off any boo-boos.
- Temporarily adhere the card piece to your mat or grid paper to keep it in place. This helps you avoid inky fingerprints and reduces risk of your mask moving.
- Use a piece of Masking Paper wider & longer than area you need, to again help it hold the piece in place and protect against stray ink.
- Masking paper holds well in place but peels off cleanly - test this out first on scrap. If it doesn't seem to peel cleanly, try placing it first on some smooth cotton to remove any extra stick.
- Choose colours that will blend well into each other without creating any muddy mixes.
Get inky
- Always start blending with your blending brush off the page to help prevent blotches & splotches from over-inking.
- Go slow and steady adding ink lightly and evenly. You can always add more ink but you can't take it away.
- Work out roughly where you want to change colours and allow overlap between colours.
- Play, play and play some more - with colours and blending.
Which effect appeals to you more? Soft and dreamy, or bold and dramatic. Either way, thanks for visiting today and I hope you'll try some blending to create your own scene too. You'll find the full supply list you'll need for these projects here in my store.
Until next time, happy stamping!
.png)


-%20cover%20with%20shop.jpg)
%20crop%20shop.jpg)
-Cover%20with%20shop%20banner%20low%20res.jpg)

No comments:
Post a Comment
Thanks so much for taking the time to leave me a comment. I really love hearing from you.
In line with new data protection legislation (GDPR) by commenting you do so in the knowledge that your name & comment are visible to all who visit this blog and thereby consent to the use of that personal information for that specific purpose.