I do love a man in a suit (whether it's my own darling man, James Bond, or maybe even a dressed up Mr Cumberbatch or the guys from Suits), so I created this formal / tuxedo type suit card. It was very popular with my class lovelies so hope you like it too.
I also added a belly band around the front to add a bit more detail & space for a sentiment - birthday & Father's Day versions. The birthday sentiment is from Birthday Blossoms & I also used White Perfect Accents dots coloured with a black sharpie marker - easy! You can see the other sentiment in this pic:
I really liked how Sarah attached the shirt front to one side of the jacket so I did this too. This larger picture shows more detail.
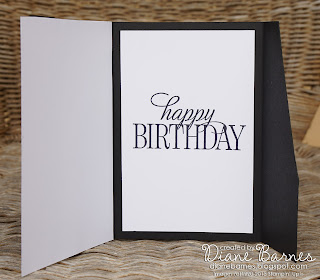
The card opens up to show a large space for your message. I stamped the birthday version with the fantastic sentiment from Happy Birthday Everyone, a must-have stampin' rewards only stamp set from the annual catalogue. The ' to a wonderful man' sentiment is from this set too.
Re-edited 23 August 7pm
SUIT CARD TEMPLATES & BOW TIE TUTORIAL IS HERE!
Please refer to Sarah Jane's suit card tutorial for instructions to make a large suit card.
Use the measurements in my templates to reduce size to my standard size card version (14.8 x 10cm or 6 x 4 inch front) with an envelope punch board bow tie.
If you have questions or need more info about making my smaller version, please leave me a comment including your e-mail addy & I'll be happy to help.
VIEW & DOWNLOAD MY SUIT-TUXEDO TEMPLATES & BOW TIE TUTORIAL PDF.
Note: please choose the download option (arrow & line) to download. Do not choose 'share' as this just sends me an e-mail.
Here are pics from the tute so you can see what's included, but don't save them as they're just small versions of the actual doc.
Thanks for visiting & I hope you like my card. Please check out all the Just Add Ink fab team's creations here & try the challenge too - you can never have too many masculine card ideas.
Please leave some comment love & pin the card if you like my card. Here's a combined pinnable image if you do.
Back soon!
Inky wishes, Di
Supplies
To see & order any items used in today's project, just click on the items below to see them in my Online Store. You can order from me if you live anywhere in Australia. I would love to be your Demonstrator if you don't already have one. Please allow "Demonstrator contact" in your preferences so I can thank you properly when you place your order.
Note - Stamp sets & bundles noted below may be available in other mount options (eg wood, cling rubber or photopolymer). I have listed the option that I used. Please check the online store if your preference is different.
.png)


16 comments:
WOW, Di you have out done yourself with this card. So very impressive.
Thanks heaps, Teneale :-)
Wow, Di. This is pretty awesome. You've also gone to a lot of effort writing up a tute. I love the clean lines of the tux cards - masculine perfection. xx
Di saying this is awesome is an understatement. The card is fabulous (very James Bond! - love it) and your tutorial is filled with detail and an amazing piece of work! xxx
Stunning Di - perfect for so many occasions! Sherylee.
Oh wow Di - these are absolutely fantastic! I love the details in the Tuxes and how the cards open - they certainly do look very James Bond or Mr C :-) And thank you too for your Tutorial - wonderfully detailed and I can't wait to try it! xo
Words...looking for them...just have to pick my jaw up off the floor! This is absolutely JAW DROPPING! Like WOW! And a tutorial to match!! LOVE this Di...you're so clever!
You've done it again Di! Another fabulous creation...Very dapper indeed! Lovely of you to share the link to the original tutorial..:0) xx
Di. This is an AWESOME card, I love how the card opens up. Thanks for the tutorial, will have to give it a go
Wow, what a stylish masculine card this is! Timeless and ageless!
How generous and kind of you to share your tutorial, templates etc to make this fabulous card. It is so clever and creative. I just know I will be making this card in the future, using your templates and would like to thank you in advance x. Very striking and wow card, just love it!
How did I miss this?? Its the most awesome card ever!!!!
Thank you so much for sharing template. Saves so much time and effort. Going to add a pocket to contain monetary gift.
Thank you so much for sharing this tutorial! Great for Father's day as well :)
Thank you for sharing this tutorial. I just used the jacket and made it into a white doctor's lab coat for my daughter's graduation from Medical School.
I personally want to say Thank you for converting centimeters to inches. I wasn't doing a very good job of it. Also Thank you for sharing and for showing us both versions of this card. I'm doing a wedding next year, I'll make "Thank You cards" for the groom. So, I'm saying Thank YOU for everything! Happy Holidays!
Post a Comment