Friday, 21 August 2015

JAI 276 - Just add male cards - suited up tutorial

It's time for a new Just Add Ink challenge & Jan has set us a well timed challenge to create a card for males, since it's Father's Day on September 6th in Australia. I ran a masculine card class last weekend too so I combined the challenge with my class card.  
I do love a man in a suit (whether it's my own darling man, James Bond, or maybe even a dressed up Mr Cumberbatch or the guys from Suits), so I created this formal / tuxedo type suit card. It was very popular with my class lovelies so hope you like it too.
 My card was adapted from this awesome card & tutorial by Sarah Jane Rae, which I pinned a while ago. I adapted her idea to make a smaller card using a standard half A4 sheet to fit a regular C6 envelope (the card front is 10 x 14.8cm or approx 4 x 6 inches). Sarah's card front was about double this size.  I used the envelope punch board to make my bow tie). I used some White Perfect Accent dots for the shirt buttons.
I also added a belly band around the front to add a bit more detail & space for a sentiment - birthday & Father's Day versions. The birthday sentiment is from Birthday Blossoms & I also used White Perfect Accents dots coloured with a black sharpie marker - easy! You can see the other sentiment in this pic:
 I really liked how Sarah attached the shirt front to one side of the jacket so I did this too. This larger picture shows more detail.
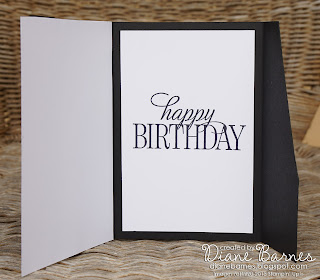
The card opens up to show a large space for your message. I stamped the birthday version with the fantastic sentiment from Happy Birthday Everyone, a must-have stampin' rewards only stamp set from the annual catalogue. The ' to a wonderful man' sentiment is from this set too.
I was hoping to share my instructions to make my card in this post but it's taken much longer to prepare than I expected, so I'll post them separately - hopefully sometime tomorrow - & edit this post to include the instructions link too.

Edited 21 August, 2pm
Re-edited 23 August 7pm

SUIT CARD TEMPLATES & BOW TIE TUTORIAL IS HERE!


Please refer to  Sarah Jane's suit card tutorial for instructions to make a large suit card. 
Use the measurements in my templates to reduce size to my standard size card version (14.8 x 10cm or 6 x 4 inch front) with an envelope punch board bow tie.
If you have questions or need more info about making my smaller version, please leave me a comment including your e-mail addy & I'll be happy to help.


VIEW & DOWNLOAD MY SUIT-TUXEDO TEMPLATES & BOW TIE TUTORIAL PDF.

Note: please choose the download option (arrow & line) to download. Do not choose 'share' as this just sends me an e-mail.

Here are pics from the tute so you can see what's included, but don't save them as they're just small versions of the actual doc.


Thanks for visiting & I hope you like my card. Please check out all the Just Add Ink fab team's creations here & try the challenge too - you can never have too many masculine card ideas.
Please leave some comment love & pin the card if you like my card. Here's a combined pinnable image if you do.

Back soon!
Inky wishes, Di

Supplies
To see & order any items used in today's project, just click on the items below to see them in my Online Store. You can order from me if you live anywhere in Australia. I would love to be your Demonstrator if you don't already have one. Please allow "Demonstrator contact" in your preferences so I can thank you properly when you place your order.
Note - Stamp sets & bundles noted below may be available in other mount options (eg wood, cling rubber or photopolymer). I have listed the option that I used. Please check the online store if your preference is different.


Friday, 7 August 2015

JAI 274 inspiration challenge - Hardwood for Dad

It's inspiration pic challenge week time week at Just Add Ink & Trish has challenged us to use these fab images as our inspiration.
This challenge coincided with my dad in-law's birthday so that helped narrow my focus to make this card for him.

I really loved the graphic timber pattern so I recreated part of it using the large Hardwood timber background stamp. I wanted to stay true to the pic so that meant making separate strips with mitred edges. I started by stamping Hardwood on white & crumb cake card with crumb cake ink, then on sahara sand card with sahara ink. Then I cut it into strips with mitred edges, sponged the edges & adhered them onto another piece of card. The timber strips were quite wide so the card needed to be large to show off the pattern. The finished card front is about 8 x 6 inches (30.5 x 20cm).

I ummed & ahhed about the sentiment as I didn't want to hide the pattern. Finally I added a vellum banner with a smaller stamped (Bohemian Borders) soft suede banner on top to back the black, happy die cut (yes I used Crazy About You again - a definite fave). The birthday sentiment is from Tin of Cards - I thought the font worked nicely with the timber look. The linen thread loops added a natural touch & some softness. Here's a closer look
I was pretty happy with the final card & hope my dad in-law likes it too.

I think you'll love how all the team interpreted the challenge so pop over to the JAI blog to see their projects. We'd love you to try it yourself too. Thanks for visiting today & remember to pin my card if you want to save it for later.

Inky wishes, Di
Supplies
To see & order any items used in today's project, just click on the items below to see them in my Online Store. You can order from me if you live anywhere in Australia. I would love to be your Demonstrator if you don't already have one. Please allow "Demonstrator contact" in your preferences so I can thank you properly when you place your order.
Note - Stamp sets & bundles noted below may be available in other mount options (eg wood, cling rubber or photopolymer). I have listed the option that I used. Please check the online store if your preference is different.


Product List

Wednesday, 5 August 2015

Sprinkles of Life ice cream birthday cards

Today I'm sharing a few cards using the Sprinkles of Life stamp set. This fun set includes lots of images to make cupcakes, ice cream cones, baskets of flowers, trees, & coordinating sentiments for lots of occasions - the possibilities are endless with this cutie. Even better, $3 from each set sold benefits Ronald McDonald House Charities (RMHC).
This first card was a new catalogue sneak peek project for my end of May classes.
I love these colours together (mint macaron, blushing bride, so saffron & tip top taupe) & wouldn't say no to some matching real gelato ;-) Eagle eyes might notice that this JAI butterfly card also uses these colours minus the saffron - & this was inspired by these cards).
I heat embossed the ice cream scoops with versamark & clear embossing powder which gave them a lovely shine - & was so quick since for multiple coloured card. I clear embossed the cone over tip top taupe ink as I wanted a darker look. Our classic pads are not generally recommended for embossing but it can be done if work quickly. Here's a closer look

There's a story I'm sure you can relate to behind my second card.
It started off the same as the first card but then took an unfortunate dive into my mint macaron ink pad, leaving a nice big splodge of ink on it. So I very gently pulled the card apart (thank goodness I hadn't used liquid glue), embossed a new white panel using our new Elegant dots embossing folder, placed it over the splodge & added a banner with a scrap of blushing bride card.

Last but not least, is this super sized cone card. I had a leftover card kit & some extra stamped pieces so I has a play & came up with this variation.
I really like how this one turned out & don't you love when you use up your leftovers?
This will definitely be the first of many Sprinkles of Life projects. I'm also thinking about having a fundraiser class using it, so if you're local to me, let me know if you're interested.
Thanks for visiting today & If you'd like more info on the cards, just ask. Remember to leave a comment or pin the cards if you like them too.
Inky wishes, Di

PS. here's a combined version for you to pin :-)
Supplies
To see & order any items used in today's project, just click on the items below to see them in my Online Store. You can order from me if you live anywhere in Australia. I would love to be your Demonstrator if you don't already have one. Please allow "Demonstrator contact" in your preferences so I can thank you properly when you place your order.
Note - Stamp sets & bundles noted below may be available in other mount options (eg wood, cling rubber or photopolymer). I have listed the option that I used. Please check the online store if your preference is different.