Friday, 9 December 2011

Christmas SAS 1 - Jolly Bingo Bits

Here I am again with the second card from my September Christmas stamp-a-stack class. For this card, I used some of the cute images from the Jolly Bingo Bits set and the gorgeous new lace ribbon punch in choc chip, real red & lucky limeade (new in-colour for this year - a really lovely brighter olive) & white.
Here's a closer look at the stamped & pierced panel:
I got the clear mount version of Jolly Bingo Bits, so I could quickly stamp multiple images in a line or in this case, a square on the clear blocks.
For this card, I placed the 4 stamps in a square pattern on a clear block (D), which enabled me to ink up 3 of the images with my full size ink pads & one with 2 markers (bauble), & stamp them all at once onto the square white card. Then I just added extra details with markers. The colours/extras used on each image are:
1. Santa - real red ink pad, then markered over eyes with black marker.
2. Rudolph - soft suede ink pad, real red marker for nose, early espresso marker for antlers
3. Gingerbread - soft suede ink pad (this sample was choc chip but I liked the soft suede more & used it at the class), black marker for eyets, real red for mouth & old olive/real red for buttons
4. Bauble - old olive & real red marker. Tag stamped in real red with real red punched jewellery tag & silver mini brad to attach. the tag end has a half a dimensional underneath to pop to tag off the page a bit.
After I finished the images, I used the piercing template from the mat pack to pierce the border. This looks as if it takes a while, but it's quick with the template.

If you want to make card this even a little quicker with less positioning, you could stamp & punch out the images with our brand new 1 inch square punch which fits beautifully in between the pierced squares. I made a version this way, but don't seem to have a pic, so you'll have to try it for yourself.
Oh & in case you're wondering how I attached the punched lace ribbonBy the way, I used 2 way glue pen at either end of the piece & a little on the middle.

So that's it for my September Christmas SAS. Hope you liked the cards. Check out October next time!
Inky wishes, Di

Supplies:
Stamps: Jolly Bingo Bits, Pennant Parade (Merry sentiment)
Card: choc chip, real red, lucky limeade, whisper white
Ink: real red, soft suede, choc chip ink pads, real red, old olive, early espresso, basic black markers
Accessories: silver mini brads (these are so useful & a real bargain too!)
Tools: medium jewellery tag punch, lace ribbon border punch

Thursday, 8 December 2011

Christmas SAS 1 - Easy Events

Todays project was the first card from my first Christmas Stamp-a-Stack class for the year, in September & includes the branch stamp & greeting from the Easy Events stamp set.
I got the clear-mount version of this set so I could separate the sentiments from the images &  make this great set even more flexible.
As you can see, I repeat stamped the branch in celery on the card base. I also used it as a focal image on vanilla card - stamping the branch in chocolate, then the sentiment in cherry cobbler. the clear mount makes it really easy to position the greeting.
To add a little more detail, I coloured the berries & leaves using a blender pen & ink taken straight from the ink pad lid. This is such a quick & easy way to add a little more colour.
I also made this variation using the same pieces & used some dazzling diamonds to the berries to a little subtle bling....although a little too subtle to see in the pics apparently!
I think that's all I need to say, but if you have any questions, please ask. These cards could be easily translated for any number of events with a change of stamp or colour, so have a try & see what you come up with.
I'll be back with the second card from the September SAS next time.
Inky wishes, Di

Supplies:
Stamps: Easy Events
Card/Paper: certainly celery, riding hood red, very vanilla, choc chip card, wild wasabi Patterns DSP
Ink: choc chip, cherry cobbler, riding hood red, wild wasabi ink pads, blender pen
Tools: double scallop ribbon punch

Thursday, 1 December 2011

Christmas Reindeer Jars

I'm going totally out of order to show you today's project, as I just can't wait to show you these cute little reindeer jars filled with chocolate balls.
My friend Alison & I made them as little thank you gifts for all the lovely ladies from Cara's school who we volunteer with us at the school Uniform Shop & fundraising group. Normally I am such a last minute Charlie & only have these gifts ready give these out on the last day of school, but Alison is sooo organised that we got together to make them yesterday (waving at you Alison - I know you'll be reading this!).
Here's a closer version showing Rudolf & his sparkly red nose better.
Rudolph is made with pieces from the Owl builder punch, except for the antlers, which are made with the Swirls Squiggle die. (I think it's called that!). The head is the owl body with feet cut off. The nose is the largest circle (punched out with our brand new red Glimmer paper from the Summer Mini) & the eyes are...well the owl eyes! The antlers are stuck on to the white circle with a 2 way glue pen & I hand drew the mouth with an early espresso marker.  The neck is a leaf shape cut using the 1 3/4 inch circle punch. I've mounted Rudolf on a 1 3/4 inch circle & 2 3/8 inch scallop circle.

We got the idea for Rudolf from a similar reindeer on a paperclip, that my lovely friend & downline Sarah made last year for her students (I can't find them on her blog, but they were really cute).

We filled the jars (which was from Ikea - sold in a set of 4 for only a few dollars) with Darrell Lea Jingle Bell chocs. To finish off the decorations, we made a matching tag using a sentiment from 'Tags til Christmas', punched out with the square scallop punch & mounted on a 4.5cm square tag. We added a thank you message to the other side of the tag, then threaded some ribbon (from my pre SU stash) & tied a pretty bow. Done! All the ladies seemed to really like them & I think we convinced some other volunteers that they should volunteer at the Unform Shop too next year.

Anyway, I hope you like them too. If you have any questions, just leave a comment...or leave a comment anyway. I love to hear from you. Back soon with....something else!
Inky wishes, Di

PS: The super sparkly red glimmer paper is available in packs containing 2 sheets of 12inch x 12 inch card for $8.95 plus s&h. It's also available in silver for Christmas & all year round bling! See the Summer Mini HERE for more info.

Supplies:
Stamps: Tags til Christmas
Card: choc chip, whisper white & real red card, red glimmer paper (summer mini)
Ink: real red ink pad, early espresso marker
Accessories: jar (Ikea) ribbon (non SU from old stash!)
Tools: owl builder punch, 2 3/8 inch scallop punch, 1 3/4 inch circle punch, square scallop punch, Big Shot, Swirls Squiggle die, piercing tool.

So much to tell, so little time!

This is a super quick post to tell you about all the excitement that starts today, as I only have a little time before I pick up Miss C at school.
Today is the first day of Summer, which for stampers is made even better with the start of our brand new Summer Mini Catalogue. You can view it online HERE, but if you'd much rather sit with a cuppa & have a good look, contact me to get your free copy.
To make today even better, our December Frenzy sale also starts today. You'll find lots of stamp sets, accessories & tools are 30%- 50% off. You can view pics & details of what's on sale HERE, or by clicking the link. I'll be placing an order in the next day or two so let me know if you'd like anything.

Well that's all I have time for now. Time for pick-up! Let me know if you have any questions.
Inky wishes, Di

Sunday, 20 November 2011

Best of Everything Thanks

Hi there!
Tonight I'm feeling tired after a hard week, but very thankful for many things, so I thought it'd be a good time to show you a couple of thank you projects.
First up is a card & bag I made back in September, to thank a lovely hostess for a great workshop.
This was my first play (of many so far) with the fun 'Best of Everything' set, which was a total must-have on my first new catty order. The colours I've used here are peach parfait, certainly celery, choc chip & white. Here's a close up of the card...
... and the bag. These bags are so simple to make - just scoring & a few cuts - but look so effective. the matching tag adds a little extra something.
The second card I have to show you shares the same birdie layout, this time with a scallop square die, and using baja breeze, marina mist instead of the celery.
I made this one to welcome a new Demonstrator to my team in September too. As you'll see, I had some lighting issues taking this pic, so the pic colours don't look right, despite lots of photoshop fiddling (sigh)

Anyway, I'm pretty tired tonight so I'll finish here for now. If you have any questions about the projects, need any other info, please say hi & leave me a comment or drop me an e-mail.

Until next time, sending inky wishes,
Di

PS: Almost forgot - In case you haven't realised, the scallop square duo die is 10% off in November, so it's a great time to get this really useful die. There's lots more too - check out the full list of what's on sale HERE.

Supplies
Card & Bag Set
Stamps: Best of Everything, Short & Sweet
Card: peach parfait, certainly celery, white smooth card, choc chip textured card, Patterns DSP (Brights - pumpkin pie, Subtles - certainly celery)
Ink: peach parfait, choc chip, certainly celery & old olive markers, peach parfait & choc chip ink pad
Accessories: pear pizzazz poly ribbon, basic rhinestones
Tools:  Itty Bitty punch pack (flower), word window punch, large oval punch (bag)

Peach Scallop Card
Stamps: Best of Everything, Short & Sweet
Card: peach parfait, baja breeze, marina mist, choc chip, white smooth card, Patterns DSP (Brights - pumpkin pie)
Ink: choc chip & certainly celery, peach parfait & pumpkin pie markers, peach parfait & choc chip ink pad
Accessories: choc chip dotted scallop ribbon, basic rhinestones
Tools:  Big Shot, Scallop Square duo die, Itty Bitty punch pack (flower), word window punch

Monday, 14 November 2011

Butterflies of sympathy

Hi there. Hope you had a relaxing weekend.
I made today's cards a couple of weeks ago to send to family friends who have sadly lost loved ones.
While I always think of the recipient when I make cards, it's especially true when I make sympathy cards. I only hope that my little bits of paper may help them know that they're in my thoughts.
Here's the first card I made:
I used the Manhattan Flower embossing folder with the top note die & Beautiful Wings embosslit to create a soft & hopefully elegant card with a simple monochromatic combination of bashful blue, marina mist & white. I was really happy it turned out like the picture I had in my head.
I think it's pretty self explanatory, but just a little note about the largest butterfly. I layered a bashful blue butterfly over a marina mist one - with a glue dot in the centre & dimensional on the wings to give more lift. You can hopefully see it better here:
The second card shares the same design, with a blushing bride & celery colour scheme. I used some retired in-colour DSP in the same pattern.
Looking back at these cards, I think they could easily be used for many other occasions too, just by changing the sentiment & colours.

A little thank you
Before I go, I have a little thank you card to show you, that I made with some of the leftover pieces I had on my desk. The greeting is from the new Petite Pairs set, (which the sympathy cards greeting was too), this time punched out with the new small oval punch. Very quick & easy, but quite pretty too I think.
Well, I think that's all I need to say, but if you have any questions or would just like to say hi, just drop me a line.
Take care of you & yours.
Di

Supplies - All SU!
Blue Sympathy
Stamps: Petite Pairs
Card/Paper: bashful blue, marina mist, whisper white card, Patterns DSP, Patterns DSP (basful blue - subtles pack)
Ink: marina mist
Accessories: basic pearls, marina mist grosgrain ribbon (retired)
Tools: Big Shot, Top Note die, Beautiful Wings embosslit, Manhattan Flowers embossing folder

Pink Sympathy
Stamps: Petite Pairs
Card/Paper: blushing bride, whisper white card, In colour patterns DSP (retired hostess)
Ink: marina mist
Accessories: basic pearls, pear pizzazz poly ribbon
Tools: Big Shot, Top Note die, Beautiful Wings embosslit, Manhattan Flowers embossing folder

Little thank you card
Stamps: Petite Pairs
Card/Paper: pool party, pretty in pink, whisper white card.
Ink: island indigo
Accessories: basic pearls
Tools: Big Shot, Top Note die, Beautiful Wings embosslit, Manhattan Flowers embossing folder

Saturday, 12 November 2011

7th birthday blossoms & bling

I've been trying to get here to catch up on showing you some projects since the start of the month, but life has been just too busy to blog...or even get to check out my fave bloggers either, worse luck. My poor google reader is bursting at the seams! Anyway, cross fingers I get this done before I head to church.
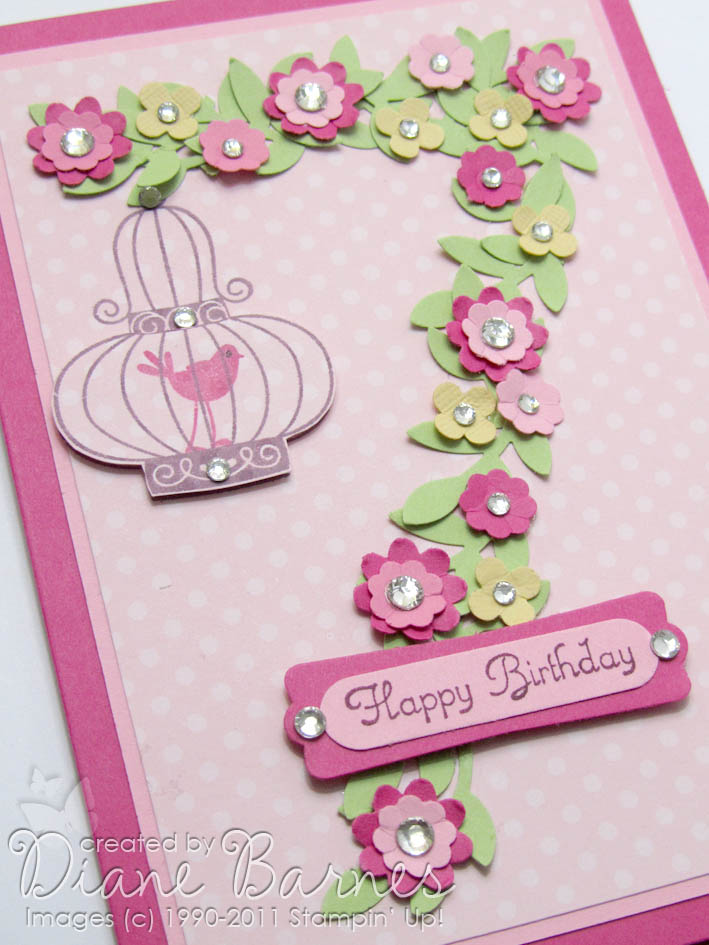
I made this one recently for a good friend's cutie patootie daughter, who recently celebrated her 7th birthday (did you guess?).
As you can see, it's mainly all about punches (which is always a good thing - right?). First, I made the number seven using layered branches punched with the bird punch, then added flowers made with the boho blossoms & itty bitty punches & a hanging bird cage from the Aviary set (why? - I just thought it was cute!). The greeting from Create a cupcake on a punched word window & modern label finished off the punch fest. The birthday girl loves a bit of bling, so I HAD to finish it with some rhinestones - 21 to be precise! You can see a bit more of the details here:
Sorry that the colours are a bit blah in the pics. I was running a bit late (again!) & took them at night. It really looks pretty & a lot brighter IRL.

Well, I hope you like the card & if you have any questions, just ask. Thanks again for your patience with my lack of blogging. I hope I can start posting a bit more often soon.

Inky wishes, Di
Supplies: All SU!
Stamps: Aviary, Create a Cupcake
Card/Paper: melon mambo, pretty in pink, so saffron,certainly celery, blushing bride Patterns DSP (subtles pack)
Ink: rose red, rich razzleberry
Accessories: basic rhinestones, glue dots, tombow mono adhesive
Tools: punches - punches - bird builder, boho blossoms, itty bitty punch pack, word window, modern label

Tuesday, 1 November 2011

Hey Big Shot! - New November Promotion

Just popping in quickly to tell you about our new Big Shot promotion for November.
You'll get 10% selected dies & embossing folders, including the new Petal Cone die that I'll be using at this Saturday's Christmas banner class.
If you don't have Big Shot yet, you can also purchase a special Big Shot Bundle at 10% off this month only. Check out the dies & embossing folders on sale below.

Page Item Description Retail Price 10% Off Price
156 117332 Scalloped Heart of Hearts Embosslits Die $21.95 $19.75
156 114515 Flower Burst Embosslits Die $21.95 $19.75
157 114517 Manhattan Flower Textured Impressions Embossing Folder $14.95 $13.45
157 116824 Petals-a-Plenty Textured Impressions Embossing Folder $14.95 $13.45
157 119277 Elegant Lines Textured Impressions Embossing Folder $14.95 $13.45
158 113440 Buttons #5 Sizzlits Die $9.95 $8.95
159 113466 Pillow Box Bigz Die $36.95 $33.25
159 114507 Beautiful Butterflies Bigz Die $39.95 $35.95
159 120903 Scallop Square Duo Bigz Die $39.95 $35.95
160 115953 Mover & Shapers Punch Windows $54.95 $49.45
160 120893 Tasteful Trim Bigz XL Die $69.95 $62.95
160 121810 Petal Cone Bigz L Die $59.95 $53.95

BIG SHOT BUNDLE
A special Big Shot bundle is also available in November at 10% off. It includes a Big Shot, plus the embossing folder & embosslit listed below.

Page Item Description Retail Price 10% Off Price
155 128994 - Big Shot Die-Cutting Machine
- Scalloped Heart of Hearts Embosslits Die
- Manhattan Flower Textured Impressions Embossing Folder
$186.85 $168.16

Contact me for more info or to book a place at this Saturday's class (only 2 places left). Back soon.
Inky wishes
Di

Monday, 10 October 2011

Pennant Parade Birthdays

Hi there!
Today, I have a couple of birthday cards to show you, made back in August with some of my pre-ordered new catty goodies, including the new Pennant Parade stamp set.
In Colour Pennants
click on pic to see a bigger version
This card was my first play with some yummy new in-colours - pool party, island indigo, calypso coral & lucky limeade...& I reeeeally like them!
It's a very simple layout, especially when both pennant styles can be punched out with the matching pennant punch (love!). The little star I used for the bottom panel comes from the same set. the happy birthday is a fave from the 'Party This Way set. I didn't have any new colour ribbons when I made it, but I think the old olive grosgrain worked in well.

Bring on the Cake
click on pic to see a bigger version
I made this card for another friend of Cara's who had her 11th birthday in August. The layout is the same, but I used some new striped Bring on the Cake DSP for the pennants. Then I stamped some cute 'Itty Bitty Bits' images & punched & layered them on top. The colours are bright & fun...but alas my pic is not so bright! Like many cards this year, this one needed to include a gift card, so I decorated an inside pocket to match.
I'm sure you'll see lots more pennant ideas over the year, as the set has so many possibilities. Until next time, thanks for visiting & leave a comment if you'd like any more info on anything.
Inky wishes, Di

PS: If you love the new in-colours, you can get all 5 new ink pads & a pack of matching cardstock for just $56.95 (plus s&h) - that's a saving of $16.70 based on the normal individual cost.

Supplies:
In-Colour Pennants
Stamps: Pennant Parade, Party This Way
Card: pool party, island indigo, calypso coral & lucky limeade, whisper white
Ink: pool party, island indigo, calypso coral & lucky limeade ink pads & markers
Accessories: old olive grosgrain ribbon
Tools: pennant punch

Bring on the Cake
Stamps: Pennant Parade, Party This Way, Itty Bitty Bits
Card: crumb cake, whisper white, poppy parade, daffodil delight
Ink: poppy parade, marina mist ink pads, blushing bride marker
Accessories: 1/8 inch daffodil delight  taffeta ribbon
Tools: pennant punch, Itty Bitty Punch Pack (circle), 1/2 inch circle punch, word window punch, modern label punch

Saturday, 8 October 2011

Elegant eggplant & melon mambo - a new fave

Hi there....& a huge thanks for hanging in there after my lack of posts.
Today, I have a couple of cards I to show you using a new favourite colour combo - elegant eggplant & melon mambo.

Casing Christine
I was introduced to these great colours back in August when I saw this fab card by the always amazing Christine Blain. I'd never thought of using the Extreme Elements set for girls cards, but I loved how Christine used it & showed the pic to Cara to see what she thought. Her verdict - "That's so awesome Mum - could you make that?" So,of course I really HAD to get it! I then pretty much immediately cased it to make a pocket card for Cara's friend's 11th birthday. This was the result.
And here's the inside.
It was such a fun card to make & I think I might be getting over my aversion to tearing too. Thanks again Christine for this great idea.

Jolly Ice-Skating
Fast-forwarding to September, I needed a card for another friend's 10th birthday. The birthday girl was having an ice skating party, so I thought the ice skate stamp from the new 'Jolly Bingo Bits' Christmas set would be perfect. I used my eggplant & melon combo again - this time with some regal rose.
I carried the theme to the inside too, which also needed to hold a gift card. By the way, the inside & front greetings are from the new hostess set - Happiest Birthday Wishes, which I'm sure is going to get a work-out in the coming year.
If you haven't tried these colours, give them a whirl. I'm sure you'll love them too. Leave a comment if you have any questions or just want to say you haven't forgotten me. Back sooner than later I hope.
Inky wishes, Di

Supplies:
Casing Christine
Stamps: Extreme Elements, On Your Birthday
Card: elegant eggplant, melon mambo, whisper white
Ink: elegant eggplant, melon mambo, regal rose, wisteria wonder
Tools: spritzer

Jolly Ice Skating
Stamps: Jolly Bingo Bits, Happiest Birthday Wishes (Hostess only)
Card: elegant eggplant, melon mambo, regal rose, whisper white, Patterns DSP (regal rose)
Ink: elegant eggplant, melon mambo
Accessories: melon mambo scallop dots ribbon
Tools: 1 inch circle punch