Wednesday, 1 December 2010

Oh what a day....& month

Despite Sydney being very soggy & grey for the first day of Summer, it's a very good day, as we get to welcome our brand new Summer Mini Catalogue. It's packed full of all new goodies including stamps, Big Shot, punches, accessories & lots more! Don't just take my word for it though, see for yourself.....


You can view it here online

or download & save a copy here

I love having my paper version, so contact me to receive your free copy.


To make the day even more exciting, we have a great new December Frenzy promotion available from now until December 29.
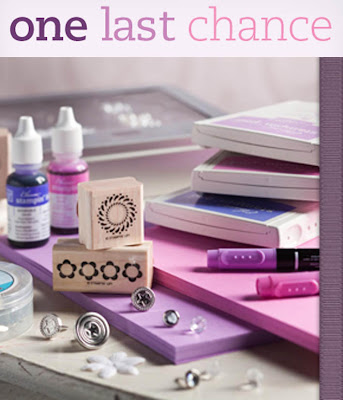
You'll receive up to 50% off selected Stampin' Up items, including stamps, markers & accessories. Click on the pic below to view everything that's available & contact me if you'd like some of these in your Christmas stocking.
A blogging update - A huge thanks to those who are still hanging in with my lack of blog posts. I haven't abandoned my blog. Life has just been really busy & my faithful laptop is still broken, so it's really difficult to edit & manage my pictures. I do have masses to show you when things slow down a bit. Thanks for your understanding. I hope to be back soon.

Inky wishes, Di

Monday, 30 August 2010

Embrace life in brocade

Time seems to be going in fast forward lately & I can't believe it's the end of August & I haven't had time to show you any projects.
Now, since there's only one more day until we finally say farewell to our current catty, I thought I'd show you an 8 card set we made at my June stamp-a-stack (yes, June), using the Embrace Life stamp set.

I'll really miss having brocade blue around, as it's always been a favourite of mine (especially with vanilla – it seems such an elegant French combo to me) so this card set was a bit of an fond adieu to it. As it turned out, most of what I've used, including the beautiful 'Embrace Life' set is also retiring, so it really is a farewell. Anyway, here are the cards... The layouts are all different, but all include basically the same card & paper pieces - in brocade blue, bashful blue, vanilla & kraft card & Bella Bleu DSP.
This 'Birthday Cheer & Wishes' card above was based on the layout of  a 2009convention swap (I think) by the fab Marelle Taylor. Such a great layout.
Just a final note...
Embrace Life is 25% off until tomorrow & then it will be gone for good, so contact me by 6pm tomorrow if you need this or any other final goodies.

Of course, if you have any questions about the cards or anything else, just drop me a line & I'll be happy to help. Thanks very much for visiting & for your patience between posts. I really do appreciate it. I do have lots more to show too, but not much time to post at the moment...but will see how it goes.

Inky wishes, Di

Supplies:
Stamps: Embrace Life (retiring), On Your Birthday, Cheer & Wishes (retiring)
Ink: brocade blue, bashful blue
Card: brocade blue, bashful blue, vanilla & kraft card, Bella Bleu DSP
Accessories: rhinestone brads, .
Tools: scallop edge punch, large oval punch, sponge dauber

Thursday, 5 August 2010

Help Hudson get some wheels

So who's Hudson & why does he need some wheels? Pop over to the helping hudson blog & you'll see he's a gorgeous little boy who needs a 'Kid Walker' to help him learn how to walk.

The helping hudson blog has been set up by a fabulous group of Aussie Stampin' Up! Demonstrators who are raising funds to help Hudson gets his wheels. They're selling tutorials donated by Demonstrators, running daily challenges & lots more ... & did I mention they're giving away great prizes too.

There are 6 different tutorial packages you can choose from & each package includes 10 tutorials....& they're only $10 each – what a bargain! Even better, buy all 6 packages for $60 & you'll get a bonus tutorial package too. I've ordered all 6 & can't wait to get started.

So, check out the helping hudson blog for all the info you need & to join in with the fun. Thank for stopping by.
Inky wishes, Di

Edited: Friday 6 August
Just popping in to say I received my tutorials this morning... & wow! There's so many great ideas, I don't know where to start.

Monday, 2 August 2010

The Last Chance List is here

Our current Idea Book ends this month, so it's time for us to say farewell to hundreds of stamp sets, accessories & lots of colours that won't be returning in our brand new Idea Book (coming next month). Some items are up to 50% off, so check out the enormous Last Chance List here to see how many goodies still on your wishlist are going.

All items are available only while supplies last, so don't wait too long or they'll be gone. Drop me an e-mail if you have any questions or if you'd like to place an order.

Inky wishes, Di

Friday, 30 July 2010

Pretty pink & chocolate cupcakes

Hi there!
Today, I have some cupcake goodies to show you, that I made using the Big Bold Birthday set. This first card was a class project from my kids cards class on July 3rd. While I think it would be cute for a little girl, I also think it works well for big girls too.
To make the cupcakes, I stamped the base in choc chip, cut it out & then crimped it to make it look more like a real cupcake. I got this BRILLIANT idea from this cute card by the lovely Andrea from my SU team. For the tops, I stamped the cake tops & sprinkles on whisper white – two with pretty in pink & regal rose ink, & one in regal rose & chocolate chip, cut them out, then added a chocolate flower & pretty in pink brad. The paper is from the super cute 'Sweet Always' DSP pack.

This was my prototype no glitter version....& I think I maybe like it better without the glitter.... but I know some of my class regulars love to glitter!
This is another card I made at the same time. I really liked this one too, but decided that doing three cupcakes at the class would be even more fun than doing one!

Liam's Cupcake Box
Imagine then my excitement the following week after the class when I saw that the fabulous Liam was on a cupcake roll too & had created this AMAZING cupcake box using Big Bold Birthday with the Big Shot Fancy Favor & Scallop Circle dies.
It was one of those moments where I wanted to run to my craft room to make it immediately! I did manage to restrain myself for a couple of hours & then made this version to match my cards.
Like Liam, I crimped the base of the box, which created such a great effect I think. I repeated the cupcake stamping. You can't see it properly, but it has a choc chip ribbon handle.
You can see the yummy cupcake closer here:
Here's a final pic of the card & box together. How cute do they look together?
Thank you again oooooooooo much Liam for sharing the cupcake box, as well as all your other amazing ideas. You're brilliant girl!
I also want to send another special (but very late) thank you to Liam, as she nominated me for a Beautiful Blogger Award back in June. This means so much to me, especially coming from someone as talented as Liam. So thanks heaps again.

Anyway, I must fly now. Have been dying to share this for weeks!
Inky wishes, Di

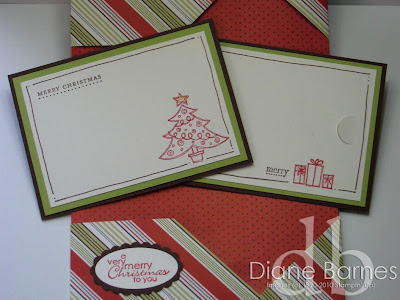
PS: I've just used the cupcakes & greeting from the set today, but there are so many other great birthday images in the set to make lots of different cards. I used the present stamps to make this Christmas gift card folder too.
Big Bold Birthday is 20% off until Saturday too & will be retiring soon, so contact me if you'd like to add it to your collection.

Supplies:
Cupcake Cards:
Stamps: Big Bold Birthday
Card: pretty in pink, pink pirouette, chocolate chip, whisper white, Sweet Always DSP
Ink: pretty in pink, regal rose, chocolate chip
Accessories: choc chip grosgrain ribbon, 1 inch stitched choc chip grosgrain ribbon, pretty in pink brad, dazzling diamonds glitter
Tools: scallop edge punch, trio flower punch, crimper

Cupcake box:
Stamps: Big Bold Birthday
Card: pretty in pink, pink pirouette, chocolate chip, whisper white
Ink: pretty in pink, regal rose, chocolate chip
Accessories: choc chip grosgrain ribbon, pretty in pink brad, chocolate jumbo brad
Tools: scallop edge punch, trio flower punch, boho blossoms punch, Big Shot, SU Fancy Favour die, Scallop Circle die, crimper

Thursday, 29 July 2010

Casing Cheep Talk

Today, I have two fun & simple cards to show you using the very cute 'Cheep Talk' set. I've wanted this set for ages & was excited to finally be able to play with it when I got it as a Sale-a-bration reward. As luck would have it though, my mojo decided it had other plans. When this happens, I sometimes, look through our catty for ideas, visit my fave blogs or sites...or if all else fails, organise supplies! This time though, I decided to visit the Cheep Talk gallery on Splitcoast to see if it would spark some inspiration. Fortunately, there were lots (over 900 cards just using Cheep Talk – amazing!), so this is what I made:
This one is a case of this fun card by Kreations by Kris, which she said was cased from a card the new US catty.
& this one is a case of this cute card by stamp2u.
I carried the theme onto the inside of the card too...
Anyway, I hope you like these cards. If you'd like any more info on anything, just let me know. Thanks a lot for stopping by.
Inky wishes, Di

PS: Cheep Talk is still 20% off until this Saturday. Contact me if you can't resist those cute birdies.

Supplies:
Cheep Talk Circles
Stamps: Cheep Talk, On Your Birthday
Ink: baja breeze, riding hood red, so saffron, kiwi kiss & tangerine tango
Card/Paper: baja breeze, whisper white, pacific point, so saffron, kiwi kiss & tangerine tango cardstock, Washington Apple DSP
Tools: Circle punches: (all of them! - 1½ in, 1 3/8 in, 1¼, 1 in, ¾ inch, ½ in)

Birdie on a hill
Stamps: Cheep Talk,
Card/Paper: tangerine tango, chocolate chip, whisper white & old olive cardstock, Washington Apple DSP
Ink: riding hood red, tangerine tango, chocolate chip ink pads, old olive & chocolate chip markers
Accessories: tangerine tango striped ribbon

Saturday, 24 July 2010

ESAD Christmas in July blog hop – welcome!

Hi & welcome to the ESAD Christmas in July blog hop. This is my first blog hop, so an extra big welcome if this is your first visit here.

If you're following the hop, you may have come from Susan's blog, but if not, you can join in by following the link at the end of each post. There are lots of great places to go, so if you get lost, there's a full list of all hoppers below.
I hope you're ready for the ESAD Christmas in July Blog Hop!

What is ESAD?
ESAD stands for Extra Special Australasian Demonstrators and it is an online group just for Australian and New Zealand demonstrators for Stampin' Up! We so love what we do and not only do we love to share it with our customers, friends, and wonderful blog visitors but we share our love for what we do with each other as Demonstrators.
We run swaps, challenges, tutorials, product know how and cyberstamps and we are always there to help and support each other when it's needed.
 So if you are a Stampin' Up! Demonstrator located in Australia or New Zealand, then please feel free to click here to join our wonderful group.
Now....onto my projects

Holiday Treasures Gift Card Folder
These gift card  folders are a lovely way to personalise giving a gift card & are one of my all time favourite projects. To make them, you just need a sheet of double sided paper, stamped images, ribbon & brads. I used a DSP from the 'Holiday Treasures' pack.
The Christmas tree image is from 'Fun & Fast Notes. It's water-coloured using my aquapainter with & ink pads. Of course, it's not Christmas without some Dazzling Diamonds glitter too. Here's the folder open inside.
I include 2 cards inside – one to write a message & one to hold a store card. The gift card is held in place with slits made with the slit punch. Here's a closer pic of the cards:
I've made lots of these over the years, but for this one, I fiddled with the measurements to make it a little bigger than previous ones. The final front is approx 10 x 14.5cm.
You can see more of my gift card folders here & the original tutorial I used by Andrea Hayes here.
And now for something completely different...

Desk Organiser & Notebook
My second project is this desk organiser & matching notebook.

This idea has been floating around in my head for a looong time, so thanks to this blog hop, I've finally gotten it out of my head & finished to show you. While it's not Christmas themed, I thought that Christmas also means the end of the school year teachers gifts. Of course, it would also make a lovely gift for any stationery obsessed friend too.

This idea came from a little post-it box I designed about a year ago (which somehow I never blogged!). I realised if I combined multiple sized boxes, I could make then into a little desk organiser. It's very solid too, as each of the boxes have double layers of cardstock & no raw edges. The main box is of course certainly celery (a fave if you don't know me!) & I used the gorgeous Urban Garden DSP, not quite navy card & celery grosgrain ribbon. Here are some more pics showing it empty & from the top:

...& this is the little notebook I covered in DSP to match. The quote is from the lovely 'Asian Artistry' hostess stamp set from the Autumn/Winter mini.

If you want some more facts, the organiser is approx 15cm long, 11cm high & 6cm deep & is made up of 3 separate boxes - a long box at the back, the original little post-it box & a pen holder. The measurements of the individual boxes are:
Long box: 15cm(l) x 11cm(h) x 3cm(d) (at highest point)
Post-it-box: 8cm x 8cm x 3cm (at highest point)
Pen holder: 6.5cm x 8cm x 3cm
You can see each of the boxes individually here:
Also before I finish & since I haven't shown it before, here's a pic of the original post-it box I designed.
Phew, that was a lot of pics. Thanks so much for stopping by & hanging in there. I hope you've enjoyed what you've seen &  I'd love to see some comments. If you have any questions about anything, drop me a line.

Now, get set to hop again, as your next stop on the blog hop is Paula.
...& if you're a little lost, here's a list of all the ESAD bloggers on the hop

Sonia Garbutt: http://stampinwithsonia.blogspot.com/2010/07/esad-christmas-in-july-blog-hop.html
Sharlene Torres: http://stampwithsharlene.blogspot.com/2010/07/merry-half-christmas-to-you.html
Nikki Sadler: http://www.inkyart.com.au/inkyart/2010/07/esad-christmas-in-july-blog-hop.html
Clare Mcilhatton: http://craftycowcreations.blogspot.com/2010/07/ho-ho-ho-hop-hop-hop.html
Leonie Schroder: http://www.stamp-a-latte.com/2010/07/24/christmas-in-july-blog-hop/
Gardenia Pepworth: http://alittlelessuseless.wordpress.com/2010/07/24/esad-christmas-in-july-blog-hop/
Susan Byers: http://susanstampcorner.wordpress.com/2010/07/24/christmas-in-july-blog-hop/
Narelle Hodges: http://stampwithnarelle.blogspot.com/2010/07/christmas-in-july-blog-hop.html
Bev Watt: http://stampinovation.blogspot.com/2010/07/esad-blog-hop.html
Carol-Ann Torrie: http://www.queen-of-scraps.blogspot.com/
Melissa Barkwith: http://melbarkwith.wordpress.com/2010/07/24/christmas-in-july-blog-hop/
Genelle Little: http://stampedecards.blogspot.com/2010/07/esad-christmas-in-july-blog-hop.html
Richelle Fletcher: http://stampinwithrichelle.blogspot.com/2010/07/esad-christmas-in-july-blog-hop.html
Angela Purdie: http://kintakards.webs.com/apps/blog/show/4337713-christmas-in-july-blog-hop
Katrina Criglington: http://www.katscraps.com/2010/07/its-christmas-in-july.html
Karen Southwell: http://kareniescrafts.blogspot.com/2010/07/esad-christmas-in-july-bloghop.html
Susan Joyce: http://catsinkcorporated.blogspot.com/2010/07/esad-su-christmas-in-july-blog-hop.html
Di Barnes: http://dianebarnes.blogspot.com/2010/07/esad-christmas-in-july-blog-hop-welcome.html (that’s me!)
Paula Fuller: http://stampingpawprints.blogspot.com/2010/07/esad-christmas-in-july-blog-hop.html
Claire Harrison: http://inkinclinations.blogspot.com/2010/07/its-finally-here.html
Shelley Stewart: http://stampin-shellz.blogspot.com/2010/07/esad-christmas-in-july-blog-hop.html
Linda craven: http://www.craventime2stamp.com/?p=1017
Vicki Were: http://stampinvickistyle.blogspot.com/2010/07/christmas-in-july-blog-hop.html

Supplies: All Stampin' Up! unless stated.
Holiday Treasures Gift Card Folder
Stamps: Fun & Fast Notes, Tiny Tags, Teeny Tiny Sentiments, Best Yet
Ink: black stayz on, riding hood red, old olive, summer sun classic ink pads
Card/Paper: Holiday Treasures DSP, choc chip, riding hood red, certainly celery, whisper white card
Accessories: dazzling diamonds glitter, two way glue, choc chip grosgrain ribbon, fire rhinestone brads, silver brad
Tools: slit punch, Big Shot, SU Top Note & Ovals dies, scallop oval & large oval punch

Desk Organiser
Stamps: Asian Artistry
Card/Paper: certainly celery, not quite navy, baja breeze card, Urban Garden DSP, purchased notebook (non SU)
Ink: not quite navy
Accessories: certainly celery grosgrain ribbon

Sunday, 18 July 2010

Embossed eggplant roses for JAI-26

Hi there! Just popping in quickly with an unexpected post to show my entry for the Just Add Embossing challenge this week at the fab Just Add Ink. Every week, I think "must try that challenge" but seem to never get there. This week though, I was so excited to see that I had flukily (is that a word?) just made a card that fitted the challenge, so, I just HAD to post it... & here it is!
It came about when my friend & SU team member Leesa came over last week for a play with my Big Shot. While here, she said she'd never tried heat embossing, so never one to miss an opportunity for more play, I showed her some embossing techniques & put this card together.

It may be hard to see, but the main flower is clear embossed onto whisper white card & (very roughly) colour-washed with my aquapainter & ink from razzleberry & eggplant ink pads. The embossed outline resists the ink, leaving the lovely white outlines. The roses on the eggplant base are also clear embossed. I love the really fine lines from the 'Fifth Avenue Floral' set. I must admit I don't emboss very often, but when I do, I think wowwwww, when the seemingly magic powder goes shiny & wonder why I don't do it more. You might be able to see the embossing better here:
To finish the card, I added a greeting, pale plum scallop edge, razzleberry ribbon & for an extra special touch, some pretty half pearls from the Pretties kit. Anyway, no more time to waffle, so I'll just say thanks heaps for visiting.

Inky wishes, Di

Supplies (all Stampin' Up!)
Stamps: Fifth Ave Floral, Birthday Cheer & Wishes
Card: elegant eggplant, pale plum, whisper white
Ink: elegant eggplant & rich razzleberry ink pads, versamark
Accessories: clear embossing powder, rich razzleberry polka dot ribbon (plain side up), half pearls
Tools: heat tool, embossing buddy, scallop edge punch, corner rounder punch

Tuesday, 6 July 2010

Belated birthday girl with bling ... & Spongebob

Well, today, you'll see how behind in posts I still am, as I'm going back to May 3rd to re-celebrate my beautiful big girl Cara's 9th birthday (or almost being 'double figures' & a grown up according tor her). Here's the birthday girl with her yummy Baskin Robbins ice cream cake.
 
Cara loves a bit of bling, so I wanted to get very glittery with her birthday card & thought that Sticky Cuts & Supernova glitter would fit the bill very nicely. Here's what I came up with.
& in case you missed the giant glittery flower, here's a close up:
To make it, I attached the flower sticky cut to the die cut bloom, peeled part of the image to add the blue glitter, and then peeled back the rest to add the red glitter. The centre is a build a brad that's been given the glitter treatment too with some leftover bits Sticky Cuts. I attached one side to the brad base, glittered it, and then added the clear top to seal in the glitter. The flower is attached to the paper with dimensionals. The stem (which is just a line of normal sticky strip tape) & leaves are attached straight onto to the DSP background. The DSP is from the brilliant Hand Drawn bundle - a level 3 hostess bundle of matching DSP, stamps & rub-ons. as you can see, I snuck another Top Note into the card (yes, I'm obsessed with it) for the happy birthday greeting. I couldn't find my number stamps for the 9, so I had to settle for a printed one, which doesn't totally match the colours, but what was a girl to do? It got the dazzling diamonds treatment for a little added sparkle. You can see better it here.

On the inside, I repeated the DSP from the front & used one of the matching rub-ons from the pack for the greeting. Please ignore the blurry sections, where I erased Dad's message to Cara....must remember to take pics before writing on cards! By the way, the card is front is 21 x 10 cm

The Party Invitations

You might also like to see the party invitations I made for her SpongeBob bowling party with her buddies. I had some ideas for invites, but Cara wanted use the ones the bowling Centre had provided (shock-horror!).
A compromise was called for, so I used the bowling ones as the base & inspiration for the colours – elegant eggplant, green galore & taken with teal (bet you never thought you'd see those colours together here!).

I thought a punch art Spongebob would be a fun addition (note – "thought"), but I have to say that while you know I love punches, punch art is not generally my bag & certainly not when doing multiples! Fortunately, I found this fab SpongeBob here to use. My version is not quite right, but Cara thought he was cool, so that was good enough for me....& I had no more time to fiddle! Here's the back & front of the invite (& please pardon the colours - you'll just have to trust me that the colours looked much nicer IRL).
Here's SpongeBob in close-up.
Anyway, that's all from me for now. Thanks for visiting & hope to see you here again soon.
Inky wishes, Di

Supplies:
Birthday card
Stamps: It's Your Birthday (retired)
Card/paper elements: riding hood red, baja breeze, whisper white, Hand Drawn DSP, Sweet Sticky Cuts, Blooms die cuts
Ink: riding hood red, Hand Drawn rub-ons
Accessories: riding hood red tafetta ribbon, build a brad, Sticky Strip tape
Tools: ½ inch punch, SU Top Note die
    
Invitations:
Card: Spongebob - yo yo yellow, basic black, tempting turquoise, choc chip, riding hood red, whisper white; Base – elegant eggplant, green galore/taken with teal
Tools: cropadile (small holes), punches – scallop square, ½ inch circle, ¼ inch circle, 1/8 inch hand punch, word window, large oval, trio flower

Monday, 5 July 2010

Quick & easy fresh cut notes

Today, I have a few cards to show you using Fresh Cut Notes  I like using these for those times when you need a quick card, but don't want it to look like a quick card. First up is one we made in April at the same class as the book in this post. The book took a while to do, so the card needed to be quick. We started with a fresh cut note, paper, punches, ribbon & brads and this is what we made. Very simple but pretty I think.
The only stamping is the pretty 'friends' greeting (from 'Tiny Tags'), which is punched out with the medium jewellery tag punch (both are from the Autumn/Winter Mini).

 Here are a couple more fresh cut cards I made at the same time:
For this one, I just stamped part of the die cut panel with some 'Cottage Garden' flowers & mounted it with dimensionals onto some rich razzleberry & pale plum card.
This one was a bit of an experiment using the leftover positive images from the die cuts. I sponged the pieces with pink pirouette/pretty in pink ink & arranged them into a flower. I have to say that I like the idea of using the leftovers & like bits of this card, but wasn't happy with it overall. I thought I'd show you anyway, to share the idea of using the leftover pieces. In case you're wondering, the greeting is also from 'Tiny Tags'.

If there's anything else you'd like to know about these cards or anything else, just drop me a line.
Inky wishes, Di

PS: Don't forget that both the 'Tiny Tags' & 'Cottage Garden' 2 step sets are 20% off in July with our 2 step to fabulous promotion.

Supplies: All Stampin' Up! unless specified
Card 1:
Stamps: Tiny Tags
Card/Paper: Fresh Cut Notes, Baja Breeze Patterns DSP, baja breeze, pretty in pink & pink pirouette card
Ink: basic grey
Accessories: pink taffeta ribbon, clear rhinestone brad, silver brad
Tools: punches - boho blossoms, 5 petal flower, medium jewellery tag

Card 2:
Stamps: Cottage Garden
Card: rich razzleberry, pale plum, fresh cut note
Accessories: rhinestone brad
Tools: punches - boho blossoms, 5 petal flower

Card 3:
Stamps: Tiny Tags
Card: pretty in pink, pink pirouette, close to cocoa card, fresh cut note leftovers, Candy Lane DSP
Ink: close to cocoa
Accessories: rhinestone brad, silver brad
Tools: punches - boho blossoms, medium jewellery tag, SU Top Note die

Sunday, 4 July 2010

Stamp & create... my way

At the beginning of this year, my dear friend Kellie & I were chatting ...as we do ;0).... about what we'd like to do with our classes this year. We agreed we wanted to find more ways to help our customers create at home as well as in classes & one of the ideas we came up with was to develop a resource they could refer to later.

After a lot of thinking about how I'd like mine to work, the result was...Stamp & Create Cards & More. I talked to my class regulars (hi girls! J) about whether this was something they'd find useful – which it was – so I went full steam ahead & this is what I came up with.
I decorated one of our art journals & divided it into 5 different sections to hold the different categories of information sheets I wanted to include. Each interested customer attended a class in April to decorate the journal (which itself included a number of techniques) & get the first set of information sheets.
Since then, all class attendees receive the information sheets & any other relevant info for that class & can request sheets if they can't make a class. We've added lots of sheets so far & will continue to add more over time. Before I go, here's a quick peek inside the book, showing part of a beginner's introduction to cutting card.
Anyway, that's all I have time for now. Thanks so much for visiting & hope you like my idea. Of course, if you'd like more information on anything, just drop me a line.
Inky wishes, Di

Tips: The letters are cut in a single pass through the Big Shot using the cardboard that backs our DSP packs, plus a layer of cardtock &/or DSP. the circle Cards & More logo was printed & is 3 circles sandwiched together to make faux chipboard.

Reminder: If you're part of my SU Diamond Stampers Team, you have access to all SCC&M information sheets on our team forum.

Supplies:
Card: art journal, old olive textured, rose red, kiwi kiss & pretty in pink card, Raspberry Tart DSP,
Accessories: regal rose grosgrain ribbon, flower fusion felt flowers, rhinestone brad
Tools, Big shot alphabet die, SU Top Note die, round tab punch (for dividers), 1 3/4 inch circle punch

Thursday, 1 July 2010

Do the two-step in July

During July, you'll save 20% on the two-step stamp sets listed below from the IB&C & Autumn/Winter Mini. Click on the set name to view the sets. Some of the IB&C sets will be retiring soon, so contact me ASAP so you can do the two step to fabulous.
Item 
Page 
Description 
Regular Price 
Sale Price 
116386 
39 
Loads of Love 
$39.95
$31.96 
116342 
42 
Big Bold Birthday** 
$53.95 
$43.16 
115860 
78 
A Rose is a Rose** 
$66.95 
$53.56 
116332 
86 
Playful Petals** 
$52.95 
$42.36 
115770 
98 
Cheep Talk 
$47.95 
$38.36 
115946 
115 
Wonderful Favourites 
$39.95 
$31.96 
119187 
14* 
Tiny Tags (wood-mount) 
$38.95 
$31.16 
118592 
14* 
Tiny Tags (clear-mount) 
$28.95 
$23.16 
119163 
31* 
Cottage Garden (wood-mount) 
$32.95 
$26.36 
120003 
31* 
Cottage Garden (clear-mount) 
$24.95 
$19.96 
* From Autumn/Winter Mini Catalogue
** Retiring stamp sets

Inky wishes, Di