.png)
Well I'm finally back with a new project to show you. This man's wallet is a project I've made for Damien for Father's Day & at two Fathers Day classes I've run this month. They are such a fun project & have been a huge hit with everyone at my classes, so I wanted to share them with you all too.
 I'd love if this was my own idea, but I actually first saw this one by Michele Force, which led me to the original by Lorri Heiling & this photo wallet by Jackie Topa & I've since seen lots more on Splitcoast too. I really loved the idea & so did my friend Kellie, so we got together and made one using the parts we liked from all three projects.
It's made completely of chocolate chip card (which I've found is hard to take pics of!). I pierced around the outside edges (which I find quite therapeutic) & added faux stitching with a choc chip marker. To keep the wallet closed, I attached a strip of card to the inside back of the wallet, & a punched word window to the front with brads. Both the word window & tab are also pierced & stitched. I stamped the 'Fathers Day greeting (from 'Occasional Greetings') in choc chip ink, on a scrap of choc chip card, pierced around it & distressed the edges with the edge of my scissors to give it more texture.
The inside of the wallet looks....well, like a normal wallet!
 It has a section at the back for a letter to the special dad, or as I'm going to do, a questionnaire about Damien that I'll get Cara to answer. You could of course include some cold hard cash (real or fake) if you like. On the left side, I made a transparent window section to slip in a pic of my gorgeous, cheeky & a bit toothless Cara with her Dad. On the right are two sections for holding greetings, certificates (for unlimited hugs or the like) or a store gift card, which I stamped softly with one of the 'Priceless' swirls.
A huge thank you to Lorri, Michele & Jackie for sharing their ideas & hope you all like Kellie & I's case too. I'll be back with another really simple Fathers Day card we made at the same class.
Bye for now & happy stamping!
Di
Edited: 3 Sept 2014 - PROJECT TUTORIAL ADDED
I've added the tutorial pdf to make my version of the wallet.
Download instructions here.
Note: please choose the download option to save the document - do not request a share. Thanks! Here's a quick peek of the doc. Don't save this. as it's just a picture, not the pdf.
Cheers, Di
.jpg "Mens Wallet Card & tutorial - instructions. Fathers Day or birthday by Di Barnes colourmehappy")
Supplies: Stamps: Occasional Greetings Card & Ink: Chocolate chip
Accesories: vintage bradsTools: mat pack & piercer, word window punch, corner rounder punch, slit punch, sticky Strip (esssential for attaching inside & outside - trust me!


 It's a great card to make with scraps of patterned paper. The 1 inch squares are punched out from some Petals & Paisley & Celery Prints designer paper left from my
  They're both made using the divine 'So Swirly' jumbo wheel & 'Priceless' stamp set from the main catalogue which I really love using. I mean, what's not to love about a swirl?
 The card is pretty much a complete case of
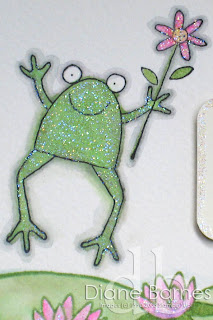
 Miss Froggy & her flower (from the super cute 'Unfrogettable' stamp set) are stamped with black Stayz-On ink on watercolour paper & coloured with gable green & green galore classic ink pads & my Aqua Painter™. The water lilies & lily pads are rolled with the 'Lily Pad' wheel in wild wasabi ink & water coloured with wild wasabi, pixie pink & orchid opulence ink pads. I also used a going gray marker around the edge of the Miss Froggy to help her 'pop'.
 Thanks so much
  If the colours look familiar, it’s because they’re from
 I bowed to include some white in the 2nd one & I think it's my favourite. I do llike the challenge colours on white more than black.
 Anyway I'm definitely off to bed now. Nightie night...or good morning.
  They don't technically fit the challenge,as there's no black, but just imagine there's now some black & white gingham ribbon on them! Anyway, must dash & clean up the dining room & spare room/craft room before Damo's parents arrive later today! Have a great weekend everyone.
 & my card:
 It's a really simple layout & uses very limited supplies. Just strips of rose red, summer sun & pumpkin pie card, matted on black card & stamped in black stayz-on ink with a gorgeous stamp from 'One of a Kind' (which I also used for Kristina's last challenge,
  I went with a combination of celery (but of course!), so saffron & vanilla, using some polka dot paper from the so fresh Palette of Prints designer paper pack that was available back in May. I think these colours are great for either a boy or girl. The pram image is from 'Fun & Fast Notes', which has 8 stamps with cute outline images & greetings To add a bit more 'pretty' to the card, I added some vanilla scalloped edges, made using the corner rounder punch (guard removed) & some vanilla taffeta ribbon.
 And here’s my card.
 I didn’t have a full picture of what I wanted the card to look like initially, so I just played with a few ideas & hoped it would come together. The belt & buckle made me think of the new Styled Silver Hodgepodge ribbon slide, so I used it with 2 stylised flowers (from ‘One of a Kind’ – another new Spring Mini set, & ‘Boho Backgrounds. I used a sueding technique (that I saw Shelli Gardner demo on a scrapbooking tv show ages ago) to soften the look of the sage & rose cards & used textured white cardstock to give...well more texture! For the greeting, I used some flower & greeting rub-ons to finish it off. I soooo love that SU has rub ons, as they’re one of my scrapping essentials.
 Anyway, hope you like it. Have a great Friday....& weekend too!
 And here's my attempt.
 I like the colour combination (OK, I was a bit scared of the pumpkin), but I found this card more difficult than I thought it would be. I'm happy with the card, but not loving it, if you know what I mean!
 Anyway, hope you like it. Definitely off to make dinner now! If I have time later, I'll try for a better pic.