Tuesday 31 July 2012

Never Ending Baby Birdies

A customer friend was blessed with a beautiful baby girl recently, so I wanted to make a special card to celebrate (smiling & waving P). I know she loves the Aviary birdies & I do too, so I made her a cute birdie themed never ending card. If you haven't seen a never ending card before, they cleverly fold to show 4 different views. 
This is the front. I stamped Aviary birdies & used some matching Nursery Nest DSP & a little bling (you do need to keep the layers flat so that it turns properly). The sentiment is from my favourite 'Fabulous Phrases' set. You then fold the fronts to each side to see the second view.
I've coloured the 'Packed for Baby' stamp here & used more birdies, words & DSP. The white panel is for a message. To see the third view, you flip the 2 centre panels over. The flowers are from the itty bitty punch pack, with cupcake sprinkle centres.
Then you open each side to reveal the final view, which shows more birdies from the DSP pack & a special message for baby Eva. Fold each side back & you're back at the front. Hours of entertainment LOL.
Making your own never ending card
Never ending cards can be a little tricky to make the first time, but once you get the hang of them, it's hard to stop. Fortunately, there are lots of videos out there that show how to make them, as I think this is one card where you do need the visual clues to get started.
I tend to cut & score my cards a little differently to the tutorials I've seen though. I prefer to score the whole piece before cutting as it's quicker & more accurate. 

This is what I do for this approx 14cm square card.
1. Cut A4 sheet to 28cm x 14.1cm.
2. Score 3.5cm in from edge down each long side.
3. Turn card & score at 3.5cm, 10.5cm, 17.5cm, 24.5cm. 
4. Cut into 7cm wide pieces. You will then have 4 pieces that are 7cm x 14.1cm.
This template shows where the score lines (broken lines) & cut lines should be:
 
To put together your card, follow one of the the videos I've linked to:
The original video by Dawn that showed me how to make them
These 2 videos make a different sized card using the same principles:
Stampin' Up never ending card video
Another video by Dawn
You might also like to see my other never ending cards.

This was such a fun project to make & I hope the receipients enjoy turning it around & around & around as much as I do.  Thanks very much for visiting. If you have any questions or would just like to say hello, leave me a comment.

Inky wishes, Di

PS: I just realised that the Packed for Baby stamp I used here is from the Autumn/Winter Mini & only available until the end of today! Let me know ASAP if you'd like to order it or any of the other fab goodies in the Mini.

Supplies:
Stamps: Aviary, Fabulous Phrases, Packed for Baby, Curvy Verses
Card/Paper: certainly celery card (base), whisper white, pretty in pink card, Nursery Nest DSP
Ink: perfect plum, marina mist, certainly celery, pretty in pink, so saffron, bashful blue ink pads or markers
Accessories: basic rhinestones,
Tools: itty bitty punches, cupcake punch, word window punch, Big Shot, Timeless Type alphabet dies

Thursday 19 July 2012

Just Add Cake Mini Album

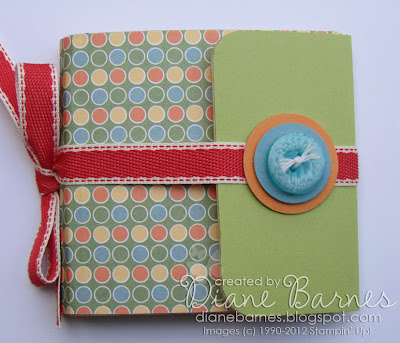
I haven't scrapped in a long while, but lately I've been feeling like I'd like to start again.  Last month, a scrappy friend asked me to run a workshop for her & I thought it would be fun to make a scrap themed gift. I'd pinned this cute little mini fold book ages ago (as you do) & thought it would be perfect. I made my version with 9 x 9cm square pages & here it is.
The base album is totally made with crumb cake cardstock, The colour palette had to suit boys & girls (my friend has 1 of each) so I thought the Just Add Cake DSP pack fitted the bill perfectly. I covered the base in different sheets from the DSP pack (so easy when they all match). I kept the embellishments flat & simple using stamped words representing family & love (from Fabulous Phrases) punched with the modern label to let the pics & words star. Here are some more pics...
 
Sorry the pics are a bit dark The weather was unfortunately very blah at the time & it very tricky to hold & photograph! I had such a blast making this little book, so I will definitely be trying more. My friend said she loved it too, so I was very happy all round.
Well it's my bedtime now, so thanks very much for stopping by. I hope you enjoyed seeing my little book. If you have any questions, just leave me a comment.
Inky wishes, Di

Supplies: All Stampin' Up! except noted
Stamps: Fabulous Phrases
Card/Paper: crumb cake, certainly celery, marina mist, poppy parade cardstock,  Just Add Cake DSP
Ink: early espresso classic ink pad
Accessories: poppy parade ribbon, button (marina mist)
Tools: punches - scallop circle, modern label, 1 3/8 in circle, 1 1/4 in circle, 1 in circle
Other: velcro dots (not SU)

Monday 16 July 2012

Casing Shelli - Bright Blossoms

I was fortunate to go to part of the fantabulous SU Convention in May & especially grateful to see SU founder & all round amazing lady, Shelli Gardner's stamping presentation. If you read Shelli's blog post, you'll know that it didn't go quite as she had planned, however she shared many wonderful ideas. One project I really loved was a very simple but elegant & clever card made with the Bright Blossoms set from the Autumn/Winter Mini. So, when I was making a card for my lovely friend & fellow demo, Leanne, I decided to case Shelli's card. I'd show you the original but my pic turned out terrible. It's very true to Shelli's design though, except for a bit more background texture.
Isn't it a clever idea? The colours are crumb cake (kraft) & elegant eggplant & the 'tablecloth' is made with the 2nd smallest label framelit. The flower vase was inked stamped in white craft ink & eggplant markers. The stamped panel is double matted, to give a little more depth.
Back to Shelli's presentation for a mo. As I sat with around 500 other demo's watching Shelli experiencing what what is probably my worst Demo nightmare, I was so impressed by her grace & sense of humour in the face of disaster & that she just kept going. I think everyone in the room wanted to hug her & tell her that it was OK, as we all mess up sometimes - thankfully, not always in front of 500 people. It was a much needed reminder to me (as a self-named 'disorganised perfectionist') that we're all human & not perfect....& that's OK...both in SU & life in general.

Anyway, I digress....as usual. I hope you like Shelli's card as much as I did. If you have any q's, just let me know. Thanks very much for visiting & I hope to see you here again soon.
Inky wishes, Di

Supplies (All Stampin' Up!)

Stamps: Fabulous Phrases, Bright Blossoms
Card: crumb cake, whisper white, elegant eggplant card, Patterns DSP (eggplant)
Ink: elegant eggplant classic ink pad & marker, whisper white craft ink pad
Tools: Big Shot, Square lattice embossing folder, labels framelits

Tuesday 10 July 2012

Helen's brilliant flower pots

The projects I'm sharing today come with great thanks to one of my favourite cardmakers - Helen...or H2 as she's known on her fab blog. Back in Feb, Helen shared some fantastic flower pots made with the petal cone & Blossom Party dies,which I absolutely loved. So, I contacted Helen to ask her permission to use them for my Mother's Day class. Not only did she say yes, but she very generously shared her tutorial with me and showed me an even more amazing version she'd made, attached to a centre step card ehich I HAD to try. You can see Helen's centre step version here...
And this is my version...
I loved the pool party, calypso coral & vanilla colour combination Helen used for her pots (& everything else). Like Helen, I used a magnet sheet on the back of my pot, so it can be removed from the card. I wanted the card to still look finished without it though, so I used a pretty floral piece of Berry Blossom DSP behind the pot. You can see the plain centre step card here.
I also made another version in the other gorgeous colour combination Helen used - pool party, wisteria wonder, so saffron & certainly celery. This was also a Just Add Ink colour challenge set by my friend Kim! (small world). I love the wisteria spotted paper from the (Sweet Shop Specialty pack), as the spots are embossed.
All the ladies at my Mother's Day class LOVED the card, as did Shirley, my lovely MIL, when she received one for Mother's Day.
Thanks again so much Helen for generously sharing your wonderful talent. If you love this project, you MUST check out Helen's blog, as it's just packed with amazing projects.

Edited 16 July 2012 - Helen has very kindly added the flower pot tutorial to her blog so you can Download it here! Thanks very much Helen.

Edited 16 Sept 2014
You can now download my pdf tutorial for this size centre step card in this post.
Hope you enjoy :-)


Well, that's all for me for now. Dinner awaits...or at least it will once I cook it. Thanks for visiting & hope to have something new to share soon.
Inky wishes, Di

Supplies:
Version 1
Stamps: Curly Cute (Happy Birthday, Fabulous Phrases (friend)
Card/Paper: calypso coral, pool party, lucky limeade, very vanilla card, Berry Blossoms DSP, Patterns DSP (in colour 11-13)
Ink: island indigo ink pad
Accessories: designer printed brads - in colour 11-13, ruffled ribbon - lucky limeade
Tools: Big shot, Petal Cone die, Blossom Party die, jewellery tag punch 
Version 2
Stamps: Teeny Tiny Sentiments (just for you)
Card/Paper: wisteria wonder, pool party, certainly celery, so saffron card, Sweet Shop Specialty DSP, Patterns DSP (in colour 11-13)
Ink: early espresso ink pad
Accessories: itty bitty buttoms, bakers twine
Tools: Big shot, Petal Cone die, Blossom Party die, jewellery tag punch, itty bitty punch pack

Sunday 1 July 2012

Simple Twitterpated Mum

Today's card is one of the cards we made at my Mother's Day class back at the end of April. This class was great for me as well as my class girls, as it meant I would be on time with my Mother's Day cards too!
I liked the pretty & soft simplicity of the card -perfect for Mother's Day I think. This was also my first card made with some (at that time) new goodies from the Autumn/Winter Mini Catalogue - the beautiful Twitterpated paper, pleated satin ribbon (I'd never be able to sew like that!) & of course my new Edgelits dies to give that lovely curve. I teamed these with the oval Designer Frames & a pretty image from the 'Tagtastic' hostess stamp set.
I liked this so much I gave it to my own wee Mum....with a little sentiment & colour variation which is much more my normal style.
 
Thinking back, Mother's Day seems so long ago, as so much has happened since then. Mum got very sick, then was in hospital. I'm glad to say she's recovering & doing much better now. It's just very hard to see her getting more fragile as time moves on.
Anyway, I'd better finish here, before I start waffling. Hope you liked my card & thanks for visiting.
Inky wishes, Di

PS: Can you believe the Autumn/Winter Mini ends this month? Don't miss out on your faves.

Supplies:  (All Stampin' Up! unless noted)

Stamps: Tagtastic (card 1 - hostess set), Short & Sweet (love you), Just Perfect Alphabet (mum)
Card/Paper: pink pirouette, baja breeze, whisper white card, Twitterpated DSP
Ink: not quite navy classic ink pad
Accessories: baja breeze pleated satin ribbon
Tools: Big Shot, Adorning Accents Edgelits dies, Designer Frames embossing folder, oval punch