Showing posts with label scrapping. Show all posts

Friday, 20 August 2021

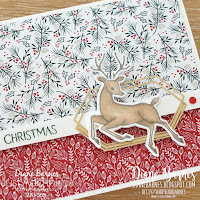
JAI 568 sketch challenge - Peaceful Deer Christmas

Handmade Christmas card using Stampin Up Peaceful Deer stamp set and punch bundle, Tidings of Christmas paper and Stampin' Blends alcohol markers. Card by Di Barnes  - Independent Demonstrator in Sydney Australia - colourmehappy - Sydney stamper


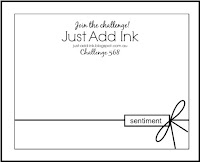
It's a sketch challenge week at Just Add Ink and Lou has created an oh so flexible sketch for us. I decided this was a perfect opportunity to make my first Christmas card of 2021. My darling man keeps saying I need to start now so I don't finish on Christmas Eve again this year. *laughs* Have you started yours yet?

I chose to use the Peaceful Deer stamp set and punch bundle - a new release from our Christmas Mini Catalogue together with the two fresh paper prints from the Tidings of Christmas paper pack (from the Annual Catalogue). Here's how it turned out.

Friday, 30 July 2021

JAI 565 colour challenge - Daisy Garden thank you card

handmade thank you can made with Stampin' Up Daisy Garden stamp set and coloured with Stampin Blends alcohol markers. Card by Di Barnes - Independent Demonstrator in Sydney Australia - colourmehappy - sydneystamper

Hello & welcome! Today I have a happy little thank you card for you. This is my Just Add Ink Design Team project for this week's colour challenge - Polished Pink, Pale Papaya & Black - suggested by Lou.

Polished Pink and Pale Papaya are two of our newest In Colours and this is the first time I've used them together. I think they work really well for the flowers on the pretty, detailed Daisy Garden image.

Here's my finished card.

Saturday, 24 January 2015

Hello Life at Sydney Party Time

Time flies! This time last Saturday I was having a lovely time at the Stampin' Up! Party Time Demonstrator event at Waterview, Bicentennial Park in Sydney with 140 other demonstrators, so today I'm going to reminisce with some ideas from the day.
The event was organised by the super talented Teneale Williams with support from Stampin' Up! Australia & she put together a wonderful day. There was a very inspiring display with projects made by four talented demonstrators Dawn Ferguson, Chloe Evans, Katie Legge & Michele Le Breton.
There were more awesome ideas & samples shared in the presentations throughout the day too. I presented about Project Life, but I'll share more on that & some of my fave display projects next time.

I was also very lucky to be asked by Teneale to make some sample projects using the cool Hello Life Project Kit & coordinating products from our Occasions catalogue.
First up, I made one up, mostly as designed by Stampin' Up!  Miss Cara saw me putting it together & said it looked really cool so I decided to make it to hang in her bedroom.... which Cara was very impressed with indeed. Apparently a good teen gift according to my 13 yr old.
Everything you see plus lots more extras is included in the kit (see it here) & the coordinating Hello Life stamp set. The only other items I used were the whisper white & Memento black ink pads. One thing I must mention is the black chalkboard paper which works brilliantly with the white ink.

My inspiration board
I created an inspiration board for my stamp room with a second kit. I customised it with some of my favourite colours, stepped up some of the elements. I used the black, white & silver elements from the kit & added some pool party, coastal cabana, bermuda bay & calypso coral - simple!
If you'd like to make your own...
- Create board - has window sheet (acetate) piece in front of the paper to serve as a white board for reminders of cards & projects I need to make. I added some DSP backing card to make it thicker.
- Heart colours - Sweetheart & confetti hearts punches used for coloured hearts (they're the same size as heart elements in the kit).
- Stamps - from So You stamp set - perfect words in an all time fave font (Amelie - see my blog header?)
- Happiness quote - is a Project Life card from the Happiness Is collection.
- Enjoy die cut from the mini treat bag collection
- Pegs are from the in-colour collection - even though my colours are diff, they worked well.
- Shaker card 'happy' image coloured with Blendabilities
PS - the silver elements are definitely silver, even though they look gold-ish in the pic.

Fun with extras
I had lots of extra kit pieces to play with so I used them in some other projects like these mini treat bag treats. I forgot to take pics of the insides so I'll add some to the post later.
The coastal cabana bag has a thank you can with gift card inside. The black & white version has a clipboard with some Project Life grid cards ready to write on. I used a little leftover scrap DSP to cover the clip.

Since Valentines day is coming soon, I made some super quick curvy keepsake treat boxes too.
I could have made lots more with the extra bits & probably still will but I ran out of time before the event. That's all I have time for now so I'll say bye & hope to see you again here again soon.
Inky wishes, Di

Supplies
To see & order any items used in today's project, just click on the items below to see them in my Online Store. You can order from me if you live anywhere in Australia. I would love to be your Demonstrator if you don't already have one. Please allow "Demonstrator contact" in your preferences so I can thank you properly when you place your order. 

Thursday, 19 July 2012

Just Add Cake Mini Album

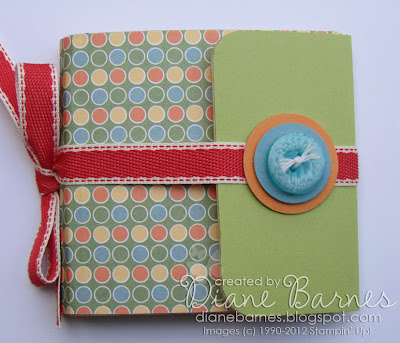
I haven't scrapped in a long while, but lately I've been feeling like I'd like to start again.  Last month, a scrappy friend asked me to run a workshop for her & I thought it would be fun to make a scrap themed gift. I'd pinned this cute little mini fold book ages ago (as you do) & thought it would be perfect. I made my version with 9 x 9cm square pages & here it is.
The base album is totally made with crumb cake cardstock, The colour palette had to suit boys & girls (my friend has 1 of each) so I thought the Just Add Cake DSP pack fitted the bill perfectly. I covered the base in different sheets from the DSP pack (so easy when they all match). I kept the embellishments flat & simple using stamped words representing family & love (from Fabulous Phrases) punched with the modern label to let the pics & words star. Here are some more pics...
 
Sorry the pics are a bit dark The weather was unfortunately very blah at the time & it very tricky to hold & photograph! I had such a blast making this little book, so I will definitely be trying more. My friend said she loved it too, so I was very happy all round.
Well it's my bedtime now, so thanks very much for stopping by. I hope you enjoyed seeing my little book. If you have any questions, just leave me a comment.
Inky wishes, Di

Supplies: All Stampin' Up! except noted
Stamps: Fabulous Phrases
Card/Paper: crumb cake, certainly celery, marina mist, poppy parade cardstock,  Just Add Cake DSP
Ink: early espresso classic ink pad
Accessories: poppy parade ribbon, button (marina mist)
Tools: punches - scallop circle, modern label, 1 3/8 in circle, 1 1/4 in circle, 1 in circle
Other: velcro dots (not SU)

Friday, 19 March 2010

Petal Party Mini Album

Hi there
As promised, I'm back with some pics of a mini scrapbook album I made for my friend Kim, who I mentioned in this post, had a new baby girl in January. The album is 6 inches x 6 inches & folds out & out & out to show lots of pages ...a bit hard to photograph though!
To make the album, I used the Stampin' Up! Petal Party Simply Scrappin'® kit & followed this fab project planner, designed by the super-talented Andrea Walford. Andrea's project was based on the 'I Wish' Christmas themed Simply Scrappin'® Kit, but it was really easy to substitute with 'Petal Party'. All you need is half a Scrappin' kit (which includes card, DSP & adhesive die cuts), plus a sheet of white card & ribbon. You'll have plenty of lovely pieces left for a second album or cards to & all for $36.95.

Here are a few more pics of some of the album pages. You'll notice I didn't add any sentiments & left plenty of space, so Kim could personalise it to fit her photos & journaling. This is the inside cover:
& here is an overview of the whole album:
This pic is the centre panel closed. The flowers are all raised on dimensionals, but I didn't fully attach the saffron flowers so Kim could slip pictures underneath.
Finally, here is a pic of Andrea's beautiful original project using the 'I Wish' kit. I've made 2 of these already & I was so pleased how they turned out. I've shown you my version of the cover below, but the remainder of my album is pretty much as per Andrea's planner which you can see here:
I'm looking at running a class to make one of these style albums in May, so if you'd be interested in making one of your own, please contact me to let me know & I'll let you know more information when I finalise my plans.

Important: If you're a Demonstrator & are interested in this project, please go to Andrea's great Demonstrator training site, http://www.demotodemo.com/ to purchase her Class Project Planner. It's well worth the investment, plus you'll find lots more wonderful planners.

Anyway, hope you like this project. It was so good to do something scrappy for a change, as It's been a while. Hope you have a happy weekend!
Inky wishes, Di

 Supplies
Card/Paper: Petal Party Simply Scrappin'® Kit, whisper white cardstock
Accessories: so saffron grosgrain ribbon (retired)

Tuesday, 11 November 2008

Fabulous flowers, prints & rub-ons


A little later than I planned, but here I am with one of the projects we made at last Saturday's embossing themed class. I have been playing around with the emerging colour technique & decided to see what sort of effect I'd get by using patterned paper, so I tried some designer Prints paper & really liked how it turned out....so I made this one for the class.To get the effect I stamped & clear embossed the large 'fabulous flower' stamp onto 2 squares of rose red Prints paper, then sponged & brayered over the top with purely pomegranate ink. I cut part of one image out & added a pink rhinestone brad (love those things!), then raised the whole flower panel off the base with dimensionals. For the original card, I also white embossed a greeting on the pomegranate strip, but at the class, I used a rub- on, as this is my favourite way of adding a white title or greeting & I wanted to show the ladies at the class how to use them. I really like the pretty in pink, rose red & pomegranate colour combo too, as I think it's stylishly girly (well to me it is anyway!). I'll show you another card with this combo later in the week.
I also thought I'd show you the first card I made, so show the different look you get when you don't ink the whole square. This time I used some So Saffron Prints paper from the pack that was available earlier this year.
As you can see, I just sponged a little over the flower edges with this one, as I liked the look better on the saffron. Incidentally, you'll never guess what colour ink I sponged on... groovy guava (true!). Lastly, I white embossed the greeting & raised it on dimensionals....truth be told after an unfortunate embossing incident on the almost complete strip nearly wrecked the card!


Rub on Some Happiness

Before I go, I wanted to also let you know about the 2nd great offer available this month on Stampin' Up! rub-ons. You'll receive receive a great 20% discount on all our Stampin' Up!® rub-on packs, when you spend $20 on normal catalogue goodies between 10-30 November. Rub-ons are usually $19.95, but this month, they're $15.96 each.
Like all of our products, co-ordination is the key, as our rub-on packs are designed to work with a selection of our exclusive stamp images. They of course work well on their own too! They're great for surfaces that are difficult to stamp on, eg. fabric, ribbon or shiny surfaces, or on glass, plastic or wooden home decor items.
If you'd like more information on how to use rub-on or you'd like to order some, just e-mail me for more information. I'll be back tomorrow with more emerging colour projects to show you.
Bye for now!
Di
Supplies:
1. Rose Red Prints
Stamps: Fabulous Flowers
Card: Pretty in pink, purely pomegranate, whisper white
Ink: versamark, purely pomegranate
Accessories: Urban West rub-ons, pink rhinestone brad (Fire pack), purely pomegranate double stitched ribbon, clear embossing powder
Tools: heat tool, sponge dauber, brayer

2. Saffron Prints
Stamps: Fabulous Flowers, Sincere Salutations
Card: so saffron, pumpkin pie, whisper white
Ink: groovy guava, whisper white, versamark
Accessories: pumpkin rhinestone brad (Fire pack), pumpkin striped ribbon
Tools: heat tool, sponge dauber, brayer

Tuesday, 30 September 2008

Sam’s Challenge and ‘a-ha’ moments

I am sooooo excited that I finally managed to complete Sam's 20K hits challenge to create a card, using this fabric and colours as inspiration...which I totally loved!
I really find that doing challenges really pushes me to think outside of the square & this one was no different, especially since I had of course left mine until the until the last day, just to add a little more pressure. I started off with a vague idea of using 'Garden Whimsy' (thanks so much Wendy for lending me your new set!), but to cut a long story short, but nothing came together until my 'domino effect' kicked in this morning & the pieces all came together (must have been your call Kellie J). This is what I came up with.
I have to say that this is definitely NOT one of my quick & limited supply cards. I faffed around A LOT! This usually results in lots of stuff being used & a final project that I'm not happy with, but I have to say that I LOVE this one (sorry to toot my own horn, but it doesn't happen that often!).

Here's a close-up, so you can see the very glittery butterfly & pretties flowers, which I coloured with pretty in pink & perfect plum reinkers & and my Aqua Painter™. Actually when I was looking at this pic, (& this is where I have to toot Stampin' Up!®'s horn too!), I thought it was a perfect example of how having a coordinated range of fabulous products makes it so easy to mix and match items to create a unique look.OK, back to the card. While it looks like a normal card from the front, it's actually has a pocket inside, similar to this one. I'd like to be able to say that was all part of the plan, but it was just one of those happy a-ha moments when I was cutting the base. I had a leftover piece when I folded the card to suit the front & thought, "that's just the right size for a pocket!"
Anyway, I won't give full instructions for the card, but here's an overview of the maybe not so obvious steps along the way:

  1. Soft Sky Piece: - The soft sky piece is actually a whisper white piece. I stamped a rock & rolled butterfly, masked it, stamped all over with the curly greeting in versamark, clear embossed, then brayered over the top in soft sky ink. Then, I thought the soft sky was too overpowering, so I covered the whole piece with paper vellum & secured it with brads (& glue dots under the flower). This piece is raised on dimensionals.
  2. The pretties flowers were coloured with re-inkers & dried with the heat tool (I am very impatient!). The petals are strategically secured at the base with glue dots.
  3. The butterfly has been rock & rolled in pretty in pink & rose red ink, with a bit of Aqua Painter™ blending before stamping. I added glitter using versamark pad & heat & stick powder (think embossing powder but sticky!) It's raised on dimensionals & slightly offset from the butterfly image underneath.
  4. The 'so happy' greeting is from So Many Sayings. It's punched out with the word window punch.
  5. The card base is 29.7cm x 10.5. The finished front is 10.5 x 12.2cm.
    The butterfly on the pocket fold is clear embossed (mmmm shiny!) .
  6. The greeting insert butterfly is rock & rolled & the edges are sponged in pretty in pink ink.
Supplies:
Stamps: Garden Whimsy, So Many Sayings
Card: rose red, perfect plum, whisper white
Ink: rose red (ink pad), pretty in pink (ink pad & reinker), perfect plum (reinker), versamark,
Accessories: pretty in pink brads, heat & stick powder, dazzling diamonds glitter, clear embossing powder
Tools: Aqua Painter™, heat gun, brayer, paper piercer

Serendipity

Finally, I have to tell you about the serendipitous moment I had this morning when I finished the card & getting ready to take pictures.....but I have to digress first (again!)

Last year, I went to an awesome scrapping convention where one of my scrapping gurus, Stacy Julian taught. One of the things Stacy teaches is the value of recognising the little moments in our day to day lives that make us happy & celebrating them. She uses the following process to do this..., or at least in my head, this is it! ;0)

Recognise it – identify the something that makes you happy. This could be anything.....& possibly only mean something to you!
Validate it – Acknowledge what that something is
Celebrate it– take a picture, make a page, write about it, tell someone about it. Just don't forget about it.

OK, now you've hopefully got the picture......little things, happy, got it!?
Well, I walked outside to take pictures on our deck & saw Cara's bedspread, which I had put out to air. Well, it just hit me! I realised that it's pretty much the exact colours from the challenge & not only that, but it has butterflies & flowers all over it! .....& I didn't even register that until I saw it. WEIRD! So, I smiled, had a happy feeling moment, then decided to take my card pics on the quilt, so I can remember that little happy moment & tell you about it too (assuming you haven't dropped off to sleep yet). Anyway, here's a final pic showing one of the butterflies.
So, my challenge to you is....look for those unexpected, little happy moments in your every day & do something to remember them.

Oh....& before I forget, you can see all of the beautiful entries for Sam's challenge here.

Thanks to those who managed to stay with me for this very long post. Have a happy day.
Di