Wednesday 16 December 2015

Christmas Shaker Cards - To You & Yours Kit

Back in November when Christmas still seemed quite far away, I ran two fun classes using the To You & Yours Shaker Card Kit...& then forgot to take pics of the cards. This kit includes 18 cards: 6 each of three different shaker card designs, including a tree, bauble, & star cards, each with their own shaker elements & foiled card base. This is probably my favourite SU kit yet, as the cards were easy to make but pack a big sparkly wow & I love interactive cards. Even better, Stampin Up! did all the work so I can play & be productive at the same time. My class lovelies chose how many cards they wanted to make at the class & I showed them how they could adapt the designs to create different looks.

Changing Up the cards
 I really enjoyed making the cards my own with some simple touches:
- Mixing up the card bases & shaker elements from the kit.
- Letting the lovely foil card bases shine by omitting the white shaker backing on most cards.
- using spare gold foil from kit to cut/punch/die cut extra shapes.
- Using matching sentiments from the Embellished Ornaments bundle (for outside & inside) on all cards.
- Using coordinated stamps & dies from the Peaceful Pines bundle with the leftover foil from the kit.
- Using gold cord on some cards for extra sparkle.
- I didn't use the To You & Yours stamp set that SU designed to coordinate with the kit since I had other supplies that coordinated so well with the kit.
So, here's what I made. Click on the pics to see better details.

Trees
All trees - Embellished Ornaments bundle sentiments
Tree 1 - Horizontal striped base, stamped tree (Peaceful Pines bundle). Spare foil - punched star & strip of gold under tree. Sequins glued inside the shaker.
Tree 2 - Diagonal striped base - I love how this looks like tinsel on the tree. Spare foil - punched star & die cut pot (Peaceful Pines bundle). Sequins mixed with glitter in the shaker - suggested by one of my clever class gals.
Tree 3 - Horizontal striped base. Spare foil - punched star & strip of gold. Sequins glued to outside of window.
Tip: want more trees? The large tree die in the Peaceful Pines bundle is the same size as shaker window.

Stars
Star 1 - kit sample except for some spare sequins glued on front & gold cord.
Star 2 - Horizontal striped base - moved sentiment to top. This is my fave star card even though I included too many stars in the shaker - go easy!
Star 3 -  Omitted gold foil border around shaker. Used kit sequins instead of stars & glued a few extra around the sentiment.
Tip: You'll only need to use half the shaker elements in the kit - use half!

Ornaments
All: No white backing piece on any card - love seeing the striped foil. Die cut real red ornament top from the Embellished Ornaments bundle
Ornament 1 - Moved sentiment. Adhered some spare gold stars to front.
Ornament 2 - Changed to landscape. Added some sequins on front.
Ornament 3 - this is mostly the kit version except for backing & addition of gold cord

Speaking of the kit, this is how Stampin' Up put the cards together with the coordinating To You & Yours stamp set.

So if you love this awesome To You & Yours Kit too, you're in luck. It's discounted in our Year End Sale from $35.70 (roughly $2 per card - bargain!) until 4 January, unless sold out first. To You & Yours stamp set is also reduced to $21.00. Get in quick for some last minute cards for to get started early on next years cards.  I've listed all the supplies used in my store list below, so check them out.

I hope you've enjoyed my ideas for the kit.  Leave me a comment if you like them or have any questions. Remember to pin for later too. I've created a collage of all the cards, ready for you to pin

Back soon with some more ideas. Thanks for stopping by today.
Inky wishes, Di

Supplies

To see & order any items used in today's project, just click on the items below to see them in my Online Store. You can order from me if you live anywhere in Australia. I would love to be your Demonstrator if you don't already have one. Please allow "Demonstrator contact" in your preferences so I can thank you properly when you place your order. Note - Stamp sets & bundles noted below may be available in other mount options (eg wood, cling rubber or photopolymer). I have listed the option that I used. Please check the online store if your preference is different.


Friday 11 December 2015

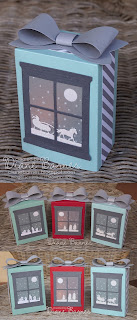
JAI292 inspiration challenge - Christmas luminaries


Christmas is in the air for our new Just Add Ink challenge & I absolutely love the inspiration images suggested by the lovely Nikki. The colours are a favourite Christmas combination of mine. Totally coincidentally, our Christmas tree is wearing the same silver, aqua & white colours this year too.
I created this week's inspiration project for a special thank you class / Christmas afternoon tea I ran for my regular class lovelies last Friday & Saturday. I wanted to make a Christmas decor project & have plenty of time to chat & share some treats too - so I designed easy Christmas luminaries.
My luminaries are basically an open ended box with a vellum window & battery tea light popped underneath, to add a lovely flickering light. This version has a pool party base, teamed with basic gray, smoky slate, & white, with some dazzling diamonds glimmer paper for the Sleigh Ride window scene.
Each person choose a colour & the scene they wanted in their window - here are all the versions we made - in mint macaron, real red & pool party.
More about my luminaries
You might notice that the village scene box on the left looks a bit different to the other two. This was the first version I made, which had a closed bottom, & unsealed top with a separate belly band to allow you access the box to switch off the tea light. I'd decided to make a simpler version with the class that left the bottom unsealed instead, so the paper & bow could be attached to the box for a neater look & less supplies, but as I was explaining my thoughts to my Friday gals, we decided that an open bottom box would be even easier to make & use, as it could just be popped over the tealight. So that's what we did. Aren't they a clever bunch. I've taught them well ;-). You can see the pretty bow better here.
Some further background - I'd initially made the box with my Gift Bag Punch Board (following the medium size box), which made it super easy to do, with no measuring. At the class I instead shared the measurements to cut & score it manually using our paper trimmers since the girls don't have the GBPB (yet ;-) ). We did however all use the GBPB to punch lovely neat tabs for our boxes - I think it's worth buying just for that purpose.

Once we scored the basic box, we cut a hole for the window using a square framelit, then added a Hearth & Home window frame die, die cut scene using the Sleigh Ride edgelit dies backed with some vellum embossed with the Softly Falling embossing folder. Some striped paper from the Neutrals 12x12 paper stack & a beautiful bow (gift bow die) made a special look. On the back, I added a white card panel stamped with a message if it's being given as a gift. We rounded the edges with my latest must have punch - the curvy corner trio punch. Love! Sorry, forgot to take a pic.

I shared some instructions with my gals, so they'd be able to make more to brighten someone elses Christmas. Please leave me a comment if you love the luminaries too & would like me to share full instructions to make them. This will help me see whether there's enough interest for me to invest the considerable pre-Christmas time involved.

Edited: Tues 15 December
TUTORIAL IS DONE!
Thanks very much to all the gals who've left lovely comments. Good news, I've completed the tutorial, including full instructions to measure & score it yourself, & also using the Gift Bag Punch Board, which makes it even quicker & easier. Please leave me a comment if you find my tutorial helpful, as I really love & appreciate hearing from you

https://drive.google.com/file/d/0B-vLPiDO8NjOZ3RrRXJxek5NVnc/view?usp=sharing

Downloading tips - when the document opens you'll see these options at the top to print or save/download it to your device etc.

To download/save it, you need to click the downward pointing arrow icon & then save. Don't choose the share option (the person with a +) as this doesn't work.

Thanks for visiting today. Remember to check out all the Design Team projects to see how they were inspired by the images & we'd love you to try the challenge too.

I hope you enjoyed seeing my project & my tutorial. Check out the supply list below to see what I used & order supplies. Remember to pin my project so you can find it again too. Here's a final combined pics.

Until next time.
Inky wishes, Di

Supplies
To see & order any items used in today's project, just click on the items below to see them in my Online Store. You can order from me if you live anywhere in Australia. I would love to be your Demonstrator if you don't already have one. Please allow "Demonstrator contact" in your preferences so I can thank you properly when you place your order. Note - Stamp sets & bundles noted below may be available in other mount options (eg wood, cling rubber or photopolymer). I have listed the option that I used. Please check the online store if your preference is different.

Product List

Thursday 10 December 2015

Surprise Year End Sale - starts today!

Excitement plus! SU announced a fantastic super surprise year end sale today, with discounts of up to 60% off regular prices. You'll find amazing bargains on a huge range of stamps, paper, accessories, dies, punches, Project Life & lots more.  Woo hoo!

What's on Sale

10-17 December - Selected current Annual Catalogue items
This is a special 1 week offer only available only to Stampin' Up! South Pacific (Australia & New Zealand).

10 Dec - 4 Jan
- Current Christmas-Holiday Catalogue items due to retire in January*
- Clearance Rack of previously retired items * - SU have added lots of new items to the list today.
*these items available while stocks last only.

Note: the normal 'Clearance Rack' category has been been renamed for the Year End Sale.
Tip - if you want to see the holiday catalogue items together, choose the sort opion 'recent first' in the store.

Want a paper list to ponder?
(don't take too long though)
download my PDF list of all sale items

Note: Prices. First price listed is catalogue price, second price is discounted sale price.
The list is sorted with Holiday Catalogue items first, then all other sale items mixed (current catalogue & retired Clearance Rack). When the doc opens, please choose the download option, not the share option. Thanks!

How to Order

You can call, e-mail or message me with your order. I will place orders daily as needed.
or Click here to order from my online store anytime for delivery straight to you.

If you need info or help with anything, just e-mail me & I'll be happy to assist.

Told you it was exciting. Back tomorrow with a project for the new Just Add Ink challenge
Inky wishes, Di

Friday 4 December 2015

JAI 291 - Just Add C - masculine birthday card

It's time for a new challenge at Just Add Ink & this week we're adding "C". Fun! I could have chosen Christmas or colouring, calypso coral, carrots (?) or.... but I think you'll see I decided to go with a masculine card using...
Yes, chevrons!
I made this card for my darling man's birthday. It was very quick to design & finish - nothing like a impending deadline to fend off procrastination. Thankfully Damo liked what I'd done, which made me very happy. It's also very supply friendly - just paper, card & one ink pad.

How did I make it?
I started with 2 fun matchy-matchy paper prints from the Go Wild paper stack.
Then I added a chevron-y vellum banner with stamped sentiment from the Tin of Cards stamp set.

Wondering how I made the chevron banner? -it was so easy to do with my punch best friend, the triple banner punch. The black pieces are the leftover ends made when you punch a 2 inch wide strip. For the smaller banner ends, I punched a banner end, then pushed the remaining card piece in a little & re-punched. You can punch the pieces at any length you like to make your own pattern. Fun!

Well that's all for me today. I've lots to finish before my last 2 classes of the year later today & Saturday so I'd best finish here  Do check out all the team's fab C cards & we'd love you to add your own C project too. Thanks for visiting today, pin & comment away if you have any q's or you liked my card too.

Inky wishes, Di

Supplies
To see & order any items used in today's project, just click on the items below to see them in my Online Store. You can order from me if you live anywhere in Australia. I would love to be your Demonstrator if you don't already have one. Please allow "Demonstrator contact" in your preferences so I can thank you properly when you place your order. Note - Stamp sets & bundles noted below may be available in other mount options (eg wood, cling rubber or photopolymer). I have listed the option that I used. Please check the online store if your preference is different.

Friday 27 November 2015

JAI 290 colour challenge - sweet treat box

It's time for a new challenge at Just Add Ink & this week is a colour challenge suggested by the lovely Jan.
My first thought at the colours was 'gulp' as I don't think I've ever combined even two of them. After some pondering I realised the Cherry on Top paper pack included some fun combinations including a sweet donut pattern. This sparked a thought to make some sort of treat, so I decorated a sahara sand box from the All Boxed Up kit & the final sweet treat turned out like this:
Tag Tips
I cut 9 donuts from the Cherry on Top paper sheet shown below using the smallest circle framelit die - happily a perfect size so no hand cutting required (yippee!) - then I added some no-mess glittery sparkle with my clear Wink of Stella pen, but it's hard to see in the pic. Exciting news - Wink is coming to SU in January - double yippee! I've included some other glittery touches with glitter ribbon & a little glimmer paper on the banner.
The fancy curved top & notch on the tag is courtesy of the new Curvy corner trio punch - seriously a must have punch from the Holiday Catalogue (see it below). Bottom corners were rounded with our regular corner rounder punch. The sweet sentiment on the banner is from All Boxed Up stamp set which co-ordinates with the All Boxed Up Kit. Click on this tag pic & you might see the sparkle better.
Here's a final pic of the box from the side. I wrapped some more Cherry on Top paper, watermelon wonder card & glimmer paper around the perfectly neutral sahara sand box for that matchy-matchy look I love. Even the peg is watemelon wonder (also from the kit):-)
I think I'll fill my box with some skittles - smaller & less messy than donuts - & share with a fellow sweet tooth.
So what do you think - did I work the colours? Do check out all the DT's projects, try the challenge yourself & link up to share it with us.  We'd love you to play along.
If you'd like to make your own sweet treat boxes, all the supplies I've used are listed below. Click on the pics for more info & to order in my store.

Thanks for visiting. I have lots more to share once I get some photos taken, so back soon I hope.
Inky wishes, Di

PS: I may have bent the colour challenge a bit as my donuts are apparently cucumber crush, not garden green, but they certainly look the part to me.
PPS: the box I used is also available in the fab Baker's Box die set - make them in any colour you like!
See & Order Supplies
To see & order any items used in today's project, just click on the items below to see them in my Online Store. You can order from me if you live anywhere in Australia. I would love to be your Demonstrator if you don't already have one. Please allow "Demonstrator contact" in your preferences so I can thank you properly when you place your order. Note - Stamp sets & bundles noted below may be available in other mount options (eg wood, cling rubber or photopolymer). I have listed the option that I used. Please check the online store if your preference is different.