Tuesday, 20 March 2012

Scallop envelope die - looking back & instructions

Hi there!
After my last post about the scallop envelope die, I went back through my blog & was surprised to find none of my other scallop envelope creations there. Turns out I was a very slack blogger in this regard! The excuse I'm going with, is that we got the Big Shot in April 2010, so I was clearly too busy playing with it to blog. Whatever the reason, I thought a retrospective look at some projects could be fun & useful to those of you who've just become friends with the Big Shot.

I'm going to leave the pics small, since there are lots, but you can click on them to get a bigger view. Since many of the papers etc have retired & my memory is not that good, I won't include a full supply list, but if you have any questions about anything, just leave me a comment & I'll do my best to answer. I'll also add a couple of instruction sheets from my classes at the bottom of the post, to make the basic boxes.

Vintage vogue mini scallop box
This little razzleberry box holds 2 cards & is made with just 2 scallop envelopes, attached by their side flaps. The project makes me smile, as rich razzleberry was a brand new colour at the time I made it & I was completely obsessed ....& I still love it. The stamp set I used was Vintage Vogue, which is still available.

Double scallop box
This useful little box is actually two of the mini scallop boxes, adhered back to back. It's a great little desk holder for post-it notes, or gift box for cards. The yellow version was actually one of the class projects at my very first Big Shot class in 2010. Still obsessed with butterflies back then! The image is from the Butterfly Prints set & is of course punched with the butterfly punch.

Wide scallop box
This is a similar box style to the one in my last post. This one was was demonstrated at the Stampin' Up! convention in 2010. I thought it was so cute, that I had to try it myself. The little cup is a single called 'Share a Cup'. It's a single cup stamp, with hello underneath (as shown in the bottom right card) & is little bargain at $11.95. It's perfect for trying the masking technique I've used here, to layer up the cups.

Square scallop box
Here are a couple more of the boxes that was the demo project in my last post. The yellow version was one I made for Cara - I thought it would be fun for her to have a monogram box. The baja breeze version includes images from the super cute Fox & Friends - it has a little turtle on the other side.
Scallop edge handbag
I've made tons of these little handbags, but this is the only one I've apparently photographed. It's not made totally with the die, but the cute scallop edge & facing is courtesy of the die. I think my friend Leanne received a swap for the basic handbag & then I worked out that I could add a pretty scallop edge to it. I don't have a tutorial link, but I thought I'd show you the bag flattened out on each side, so you can hopefully see the principle.

My Scallop Box Instruction Sheets
If you've enjoyed seeing these projects & want to make your own, you can download my class information sheets for the box projects shown. I hope you find these helpful.

Double Scallop Box:  Click here!
Square Scallop Box: Click here!

Phew! That was a long post. I hope this retrospective has given you some more ideas for the scallop envelope die. I actually have one more original idea (I think) for the die, but looking back has made me think it could be a fun Convention swap this year, so I'll save that one for now. It's bedtime for me now though, so I'll say bye for now.

Thanks for visiting & please leave me a comment if you like the projects or the instructions....or just want to say hi. Until next time,
Inky wishes, Di

Main Supplies - All SU
Tools: Big Shot, Scallop Envelope die


Monday, 19 March 2012

Scallop envelope boxes - starring Easy Events

Hi there! Tonight's project is the little box of cards I made for my friend Jo, as a thank you pressie for being a lovely hostess. The box is made with one of my first dies & still a fave - the scallop envelope.
Like the card we made at the workshop, I used the Easy Events stamp set for the box & cards... plus a ring-in stamp from the Summer Fun set (a new set I've been looking forward to colouring with). Here are the cards I made, which I hope gave Jo some ideas of how she could colour with the set.
I coloured the images mainly with ink pads & my aquapainter.
click on the pic to see a bigger version
The card fronts are 7.5cm square, so they're very quick to do & don't need a lot of supplies to look cute. All the watercoloured images are stamped on watercolour paper & decorated with punched or die cut shapes & some DSP (more Patterns & Everyday Enchantment SAB paper) or card.
Back to the box for a sec. Here's a pic of the empty box, in case you haven't seen one before. As I mentioned, it's made with just 2 scallop envelopes & a strip of scored card adhered between them.
I was really happy with how the finished box turned out & hope Jo liked it too.

Square Scallop Envelope Box
I mentioned yesterday that I didn't have pics of my demo project, but Jo kindly sent me one today. Thanks Jo! It's made with the scallop envelope die too & as you'll see, I had to add another scrunched flower made with the doily punch & a SAB brad. Obsessed!
I think the scallop edge makes this such a pretty box. It's also great for post-it-notes & can be turned into a basket by adding a handle.
So what does this clever die look like? See the pic below. The funny thing is that used it tons, but  never as an envelope...even though its very cute!
I've made lots of other projects with this die, but I can't find them on my blog, so I'm going to have to investigate! That's all from me for today, so I'll say bye for now. Thanks for visiting & leave a comment if you have any questions.
Inky wishes, Di

Supplies:
Scallop Envelope Box of Cards
Stamps: Easy Events, Summer Fun
Card/Paper: pool party, very vanilla, poppy parade, calypso coral, island indigo card, watercolour paper, Patterns DSP (in colours 11-13 & Subtles), Everyday Enchantment DSP
Ink: jet black staz on, pool party, island indigo, poppy parade, calypso coral, old olive, lucky limeade, daffodil delight ink pads or markers
Tools: Aquapainter, Big Shot, Scallop envelope die, Circles #2 die (2 inch circle), punches - decorative label, 2 3/8 inch scallop, 1 3/4 inch circle, word window, wide oval

Square Box
Card/Paper: pool party, calypso coral, poppy parade card, Everyday Enchantment DSP
Accessories: Everyday Enchantment brad (SAB)
Tools: Big Shot, Scallop envelope die, doily triple layer punch

Easy Events Cupcakes

Hi there! Today's project is one we made at my friend Jo's workshop this month. Jo wanted to learn about watercolouring & has the Easy Events set - a perfect one if you're new to watercolouring - so this is what everyone made.
I pre-punched circles of watercolour paper & we stamped the cake image with black staz-on. Then we coloured the image with four of the 2011-13 In-Colours & added a little dazzling diamonds to finish.
After that, the rest of the card came together with simple layering, including some yummy SAB paper. Just about everyone there was new to stamping and/or watercolouring, but I was really impressed with how well they did.

Going Purple!
Fast forward a week after the workshop. I needed two birthday cards for Cara's friends & no time! Thankfully, a spare workshop kit gave me card one. Then, I decided to make the same card in a different colour combo. Cara requested 'purple' for the second card, but mono-chromatic wasn't working for me, so I went out of the box (for me) & settled on elegant eggplant (love) & daffodil delight (generally not so love, but hey, they're complementary colours!). Anyway here's the finished card, complete with extra bling.You can decide for yourself whether it works! Cara thought it was cool, so that was good enough for me!...& the colours looked better IRL.
Easy Events Tip! - Use the clear mount version of the set & separate the sentiment from the image for even more flexibility to swap sentiments & easy inking. If you want to use them together, simply place on the same clear block.

Next time, I'll show you the hostess gift I made for Jo, to give her more watercolour inspiration.
I can't show you my demo project, as didn't take a pic! Until then, thanks for visiting & please leave a comment if you have any questions about anything.
Inky wishes, Di

Supplies:
Pool Party Card
Stamps: Easy Events
Card/Paper: pool party, island indigo, calypso coral, very vanilla card, watercolour paper, Everyday Enchantment DSP (SAB)
Ink: jet black staz-on ink pad, island indigo, pool party, calypso coral, lucky limeade ink pads
Accessories - calypso coral ruffled ribbon, dazzling diamonds glitter
Tools: Big Shot, circles die #2 (2 inch circle), punches - 2 3/8in scallop circle, 1 3/4 in circle, word window, modern label punch

Eggplant/Daffodil
Stamps: Easy Events, Create a Cupcake
Card/Paper: elegant eggplant, daffodil delight, very vanilla card
Ink: jet black staz-on ink pad, elegant eggplant, daffodil delight, pumpkin pie, lucky limeade ink pads 
Accessories - basic rhinestones, elegant eggplant dotted scallop ribbon, dazzling diamonds glitter
Tools: Big Shot, circles die #2 (2 inch circle), punches - 2 3/8in scallop circle, 1 3/4 in circle

Sunday, 18 March 2012

Quick & easy - Fresh Vintage + Pretty Postage

Sneaking in a quick post today, to show you some super quick & easy thank you cards. Both are made with a combination of the Fresh Vintage & Pretty Postage sets & my newest punches from the Summer Mini Catalogue - the postage stamp & 1 inch square.  Here's the first, in a fave girly combo of razzleberry & melon on crisp white.
The second is a square version in more neutral colours of tangerine tango, island indigo, lucky limeade & vanilla.
I love the pretty flower stamp from the Fresh Vintage SAB set & it fits the punch perfectly (as you would expect).
Both cards are pretty self explanatory, but if you have any questions, just leave me a comment.

Pretty Postage Gift Bag & Tag
I have one more little Pretty Postage project to show you before I go. It's a little gift bag (approx 10cm x 20cm x 5cm) made with some Flirtatious Speciality DSP & a very easy matching tag. The daffodil & eggplant is an unusual colour combo for me & didn't show up quite right in the pic, but I liked how it turned out.
Next time, I WILL be back with the workshop projects I promised!
Until then,
Inky wishes, Di

PS: The Summer Mini ends on March 31, so if you'd like the punches or Pretty Postage set, let me know before then.

Supplies:
card 1
Stamps: Fresh Vintage, Pretty Postage
Card: whisper white, melon mambo, rich razzleberry card, Patterns DSP (brights - melon)
Ink: melon mambo, rich razzleberry ink pads
Accessories: basic pearls
Tools: punches - postage stamp & 1 inch square

card 2:
Stamps: Fresh Vintage, Pretty Postage
Card: tangerine tango, lucky limeade, island indigo card
Ink: tangerine tango, lucky limeade, island indigo ink pads
Tools: punches - postage stamp & 1 inch square

Gift bag:
Stamps: Pretty Postage
Card: daffodil delight, elegant eggplant, very vanilla card, Flirtatious Specialty DSP
Ink: elegant eggplant ink pad
Accessories: eggplant dotted scallop ribbon
Tools: punches - postage stamp & 1 inch square

Saturday, 17 March 2012

Enchanted flower baskets

As promised, I'm back to show you the second project from my February class - a cute basket, made with the larger of the Two Tags die. This would be perfect to hold an Easter or Mother's Day, or anytime treat.
Like this card, the main feature is another beautiful Cathy Clark style flower.
This one is made with pool party card (which I'm kind of obsessed with atm.) I forgot to mention how I made the leaves last time, so I'll share that now. I punched the largest leaf from the Blossom Builder punch, scored a slight curve from end to end & sponged the edges & centre with a little old olive ink.
I've seen quite a few of these baskets around, but I got my starting measurements from a tutorial by the fabulous Bronwyn Eastley, who demonstrated lots of great ideas using this die at SU Regionals in Tassie. I tend to work in cm's so I fiddled around with sizing & made this almost square version, which is about 7cm deep.
This was my first version - riding hood red - which is pretty much the same size as Bronwyn's - approx 4.8cm deep.
Both baskets are wrapped with a pretty piece of Everyday Enchantment DSP & the basket handles are secured to the base with 2 mini brads.
Hope you like this little project. I'll definitely be making more of them.

Before I go, I really recommend you check out Bron's two tags tutorial, as she shows so many fantastic ways to use this die. You can find it here: Bronwyn Eastley's fantastic Two Tags die tutorial. Don't forget to leave a comment on her blog to say thanks!

Almost forgot to show you this quick & cute little tag I made at the same time with the Two Tags die, used for it's original purpose. The tag has a score line which allows it to fold onto itself & lock under the little tab. I used a smaller flower - this one is just the doily & boho punches. I added a sentiment from the Friendly Phrases set, on more DSP & some lovely coral SAB ribbon. Simple, but very cute I think
Next time, I'll show you a project for a workshop I ran for a friend, earlier this month.

Hope you're having a fun weekend. Thanks for visiting & hope you come again soon. Leave a comment if you have any questions, just want to say hi.
Inky wishes, Di

Edited to Add - 21 Mar: Now with instructions! 
I've now added my class instruction sheet to make these baskets, so I hope you find this useful. Any questions, just leave me a comment

My Two Tags Basket Instructions:  Click here!

Supplies:
Baskets
Card/Paper: pool party/riding hood red, very vanilla, old olive card, Everyday Enchantment DSP
Accessories: antique brads, mini brads
Tools: Big Shot, Two Tags die, punches - fancy flower, doily triple layer, boho blossoms, blossom builder

Tag
Stamps: Friendly Phrases
Ink: early espresso ink pad
Card/Paper: pool party, calypso coral, Everyday Enchantment DSP
Accessories:  in colour printed brads,Everyday Enchantment ribbon - calypso coral
Tools: Big Shot, Two Tags die, punches - doily triple layer, boho blosso

Thursday, 15 March 2012

Enchanted flowers side spring card

Hello, I'm finally back! Tonight's card is one I made for my gorgeous friend Kellie's birthday in Feb. I liked it so much it became one of the projects for my first class of the year too. Kellie & I both love fancy fold cards, so when I saw a tutorial on SplitcoastStampers for a side spring card, I thought I MUST try this. Then I saw some great info on our SU Demonstrator site by the v talented Cathy Clark, on making awesome vintage style flowers with punches. So, I combined the two with some pretty SAB DSP, yummy velvet ribbon & this is what I came up with.
I adjusted the size of the Splitcoast side spring card, to make it bigger & fit our standard size envelopes....although I needed a padded envelope for this flower version!
Here's a slightly different layout, using a different sentiment from the 'Friendly Phrases' set. Love, love, love this set!
And, here's a close up of the flowers.
I made the flowers with a combination of 3 punches - the fancy flower, triple layer doily & largest boho blossom. Just put all the layers together with a brad (I used our gorgeous antique brads), then wet & scrunch each layer, then gently open up each scrunched layer & leave to dry in your preferred shape. I got a little impatient & used my heat gun on some - just be careful not to singe the flower or yourself.

I think my class regulars enjoyed the project too & now we're experimenting with other flowers & punches too. Kellie liked it too, as she decided to make a variation with her own class this month.
Hope you liked them too.

If you'd like to try either the side step card or the flowers, check out the following links:
Side Spring card tutorial here
Some of Cathy's fab flower projects - you must check out all Cathy's flowers. They're just divine!
Any other questions? Just leave a comment.....or leave a comment anyway. I love hearing from you.

I'll show you the second project from my class next time. Until then, thanks very much for visiting.
Inky wishes, Di

Edited to add - looking at the pics now, the cards are at a weird angle making the diagonal look huge. It's not like that IRL. I had so much trouble photographing this & tried 3 separate times, so not going back again! Sorry!
Supplies:
Stamps: Friendly Phrases
Card/Paper: very vanilla, early espresso, riding hood red card, Everyday Enchantment DSP
Ink: early espresso
Accessories: antique brads, regular brads, very vanilla velvet ribbon
Tools: punches: fancy flower, triple layer doily, boho blossom, blossom builder, decorative label

Friday, 24 February 2012

Up, up & away

Today I have two cards to share using the Up, Up & Away stamp set. Both cards were made for good friends back in November (I know, I know, still behind!). This set was at the top of my must-have list, as I loved the look & flexibility of the images for so many types of cards & the little details like the birds & pennant trails.
One for a guy
First up, one for my friend Ray, in shades of blue.
This is one of my fave go-to layouts & I liked how it worked with the balloons. The balloons are all stamped, cut out & popped off the base with dimensionals.The navy strip at the bottom is our great denim ribbon, which is great for male cards (click on the pic to see it closer). on the inside, I created another little scene to finish it off.
...& one for a girl
I made this centre step step card for my dear friend (& now keen stamper) Alison. This was my first attempt at the style of card & won't be my last, as it's such a fun fold.
I used the balloons in a similar way to Ray's card. This time, I added some itty bitty punch flowers & pearls to make them a little more girly. The colours are a bit off in the pic, so let me tell you that they're pool party, island indigo, poppy parade & calypso coral.

If you'd like to try a centre step card, check out this tutorial on SplitcoastStampers.com.
I changed the measurements for my card & can't remember for the life of me what they were. If you'd like to know, leave a comment & I'll see if I can 'borrow' the card back from my friend (Hi Alison!).

Edited 16 Sept 2014
You can now download my pdf tutorial for a centre step card in this post.


Anyway, must fly for now. Hope you have a great weekend. Thanks for visiting & hope to hear from you or see you here again soon.
Inky wishes, Di

Supplies: All Stampin' Up!
For a Guy
Stamps: Up, Up & Away
Card/Paper: Night of Navy, bashful blue\, whisper white card, Patterns DSP (Regals - Navy)
Ink: night of navy, bashful blue ink pad & markers
Accessories: blue denim ribbon
Tools: Big Shot, Top Note die
For a Girl
Stamps: Up, Up & Away, Happiest Birthday Wishes (hostess)
Card/Paper: pool party, whisper white, calypso coral, poppy parade card. Patterns DSP (In-colour 11-13 - indigo & pool party)
Ink: poppy parade, calypso coral
Accessories: basic pearls
Tools: itty bitty punch pack flower

Tuesday, 21 February 2012

Harry Potter Owl pocket card

I've something a little different to my beloved butterflies to show you today - a Harry Potter-themed pocket card featuring my favourite owlie friend, dressed up as Harry.
(click pic for a bigger image)
I made this for Cara to give Damien for his birthday back in November. She had a great idea to get Damien tickets to the Harry Potter exhibition at the Powerhouse Museum in Sydney.....yes, we're all big Harry Potter fans, so I want a Harry themed card. I also love dressing up owlie, so I went had a bit of a play & came up with what you see here. I also tried a bit of curling & distressed  for a more vintage look...well, as distressed as I do anyway.
Anyhoo, here is Harry Owl for his close-up - very simple, but I think kind-of Harry like. All the bits as made using shapes from the owl punch.
I wanted to include the tickets in the card, so a pocket card was the best option. I found a couple of free HP like fonts online & used them for the inside message. Cara was pretty impressed with that!. By the way, the card front is approx 21cm x 10cm & fitted a DL envelope.
It was a lot of fun to make & it made Damien smile, so that's a win in my book. Hope you like it too.
That's it for me tonight - must finish the post before my battery runs out. Thanks very much for visiting. Hope you pop in again soon.
Inky wishes, Di

Supplies
Stamps: Curly Cute
Card/Paper: basic black, whisper white, riding hood red (textured card), Patterns DSP (neutrals pack)
Ink: staz on black, black stampin' write journal pen
Accessories: black satin ribbon, silver brads
Tools: owl builder punch, Big Shot, Circles #2 die

Saturday, 18 February 2012

Another enchanted butterfly

Well I didn't get back here as quick as I expected, but at least I'm here now to show you the card I made for Leesa, to match the butterfly frame I made for her.
It's a very simple & well used layout, but I liked how it turned out...I can't help myself with those butterflies. Like the frame, I used the SAB Everyday Enchantment DSP & Patterns DSP. I also used the ribbons & a brad from the SAB accessories pack. I like the subtle shimmer that the ribbons added to the card....even if it doesn't show in the pic....so here's another angle. This one shows off my new sentiment stamp set - Friendly Phrases, which includes 2 of my fave fonts & such lovely sentiments.
 I kept it simple on the inside of the card. Just some DSP, card & more butterflies just for good measure.
I hope you're not getting too sick of butterflies. I seem to have had a real obsession with them, looking through my card pics...& I haven't even shown you them all!
Thanks very much for visiting & leave me a comment to say hi if you have time. I love hearing from you. Until next time, inky wishes
Di

Supplies:
Stamps: Friendly Phrases
Card/Paper: pool party, calypso coral, poppy parade card, Everyday Enchantment DSP, In Colours 11-13 Patterns DSP
Ink: early espresso
Accessories: everyday Enchantment accessory pack (SAB) - brad & ribbons
Tools: Big Shot, Beautiful Butterflies die, Beautiful Wings die,

Thursday, 16 February 2012

Everyday enchantment butterfly frame

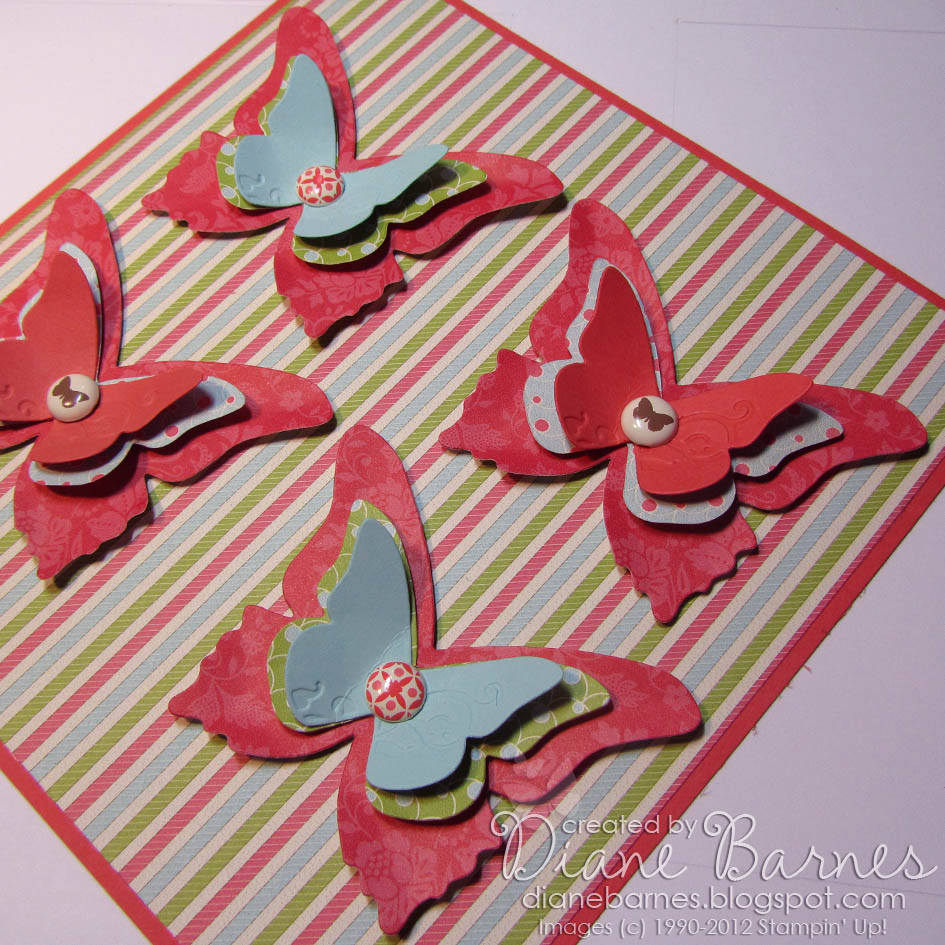
Today's project was a gift I made for my lovely friend Leesa's birthday. She loves butterflies, so I came up with the idea to make a shadow box frame with my butterfly dies & I have to say was thrilled with how it turned out.
The whole frame (which I got at Ikea ages ago) is about 71cm x 31cm & is about 5cm deep. The white border is part of the glass & the base sits well below the glass. This leaves heaps of space for some beautiful 3d butterflies. Here's a close up of each window.
The butterflies are of course cut using my fave Beautiful Butterflies die & Beautiful Wings embosslit die. "What's that beautiful paper" you say? Well, the backing & butterflies are mainly the Everyday Enchantment DSP pack,  made especially for Sale-a-bration, teamed with a little of the in-colour Patterns DSP & a little calypso coral & pool party card. The butterflies are finished off with some antique brads (large butterflies) & Sale-a-bration brad pack (smaller butterflies).

The butterflies are lightly curled at the edges & popped up with many, many, many dimensionals to keep them in place - some are 3-high! Here are some angled pics I took before the butterflies went in the frame, so you can see the layers better. Unfortunately, they were taken at night with dodgy lighting, so the colours are a little off.
I was so happy with how it all turned out & even better that Leesa really loved it. I think I'm going to have to make another one for me too. Hope you like it too. If you have any questions, please leave me a comment.
I'm out of time for now, so I'll have to show you the matching card I made for Leesa next time.
Until then, thanks very much for visiting & come back soon.
Inky wishes, Di

PS: In case you've missed the Sale-a-bration buz, you can earn the paper & brads I used here FREE during Sale-a-bration, which runs until the end of March.
You can find out more about Sale-a-bration HERE, or by contacting me

Supplies (all Stampin' Up! unless noted)
Card/Paper: Everyday Enchantment DSP (SAB), In-colour 11-13 Patterns DSP, calypso coral & pool party card
Accessories: Antique brads, Everyday Enchantment brads (SAB)
Tools: Big Shot, Beautiful Butterflies die, Beautiful Wings embosslit die
Other: frame from Ikea